---
title: "Roles"
slug: "roles-overview"
updated: 2025-01-24T09:12:51Z
published: 2025-01-24T09:12:51Z
canonical: "help.symphonysummitai.com/roles-overview"
---
> ## Documentation Index
> Fetch the complete documentation index at: https://help.symphonysummitai.com/llms.txt
> Use this file to discover all available pages before exploring further.
# Roles
### Overview
The section discusses various default system and Application Designer capabilities such as creating **Roles**, assigning **Role Types** and mapping **Role templates** in **User Roles** under **Design** **Studio**.
The illustration showcases the capabilities of default system and Application Designer / Administrator under the **Design Studio** layer.
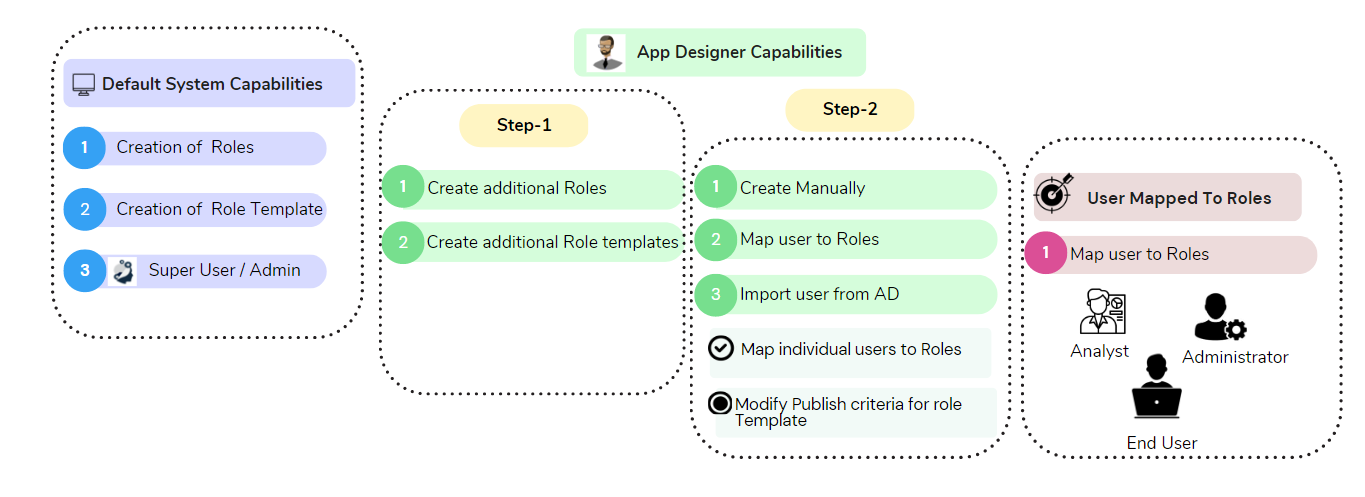
### Default Roles
The **Designer**, **Administrator**, **End User**, **Approver** and **Analyst** **Roles** are created by default. The respective **Role templates** are created and linked to corresponding **Roles**.
Refer to the illustrations below for more details about the default **Application** capabilities.
User Persona: Administrator or Application Designer
### Custom Role Creation
ITSM or ITAM Application Designer or Administrator can create **Roles**, **Role templates**, users and assign **Roles** to the users such as Operator, Data Entry as End User.
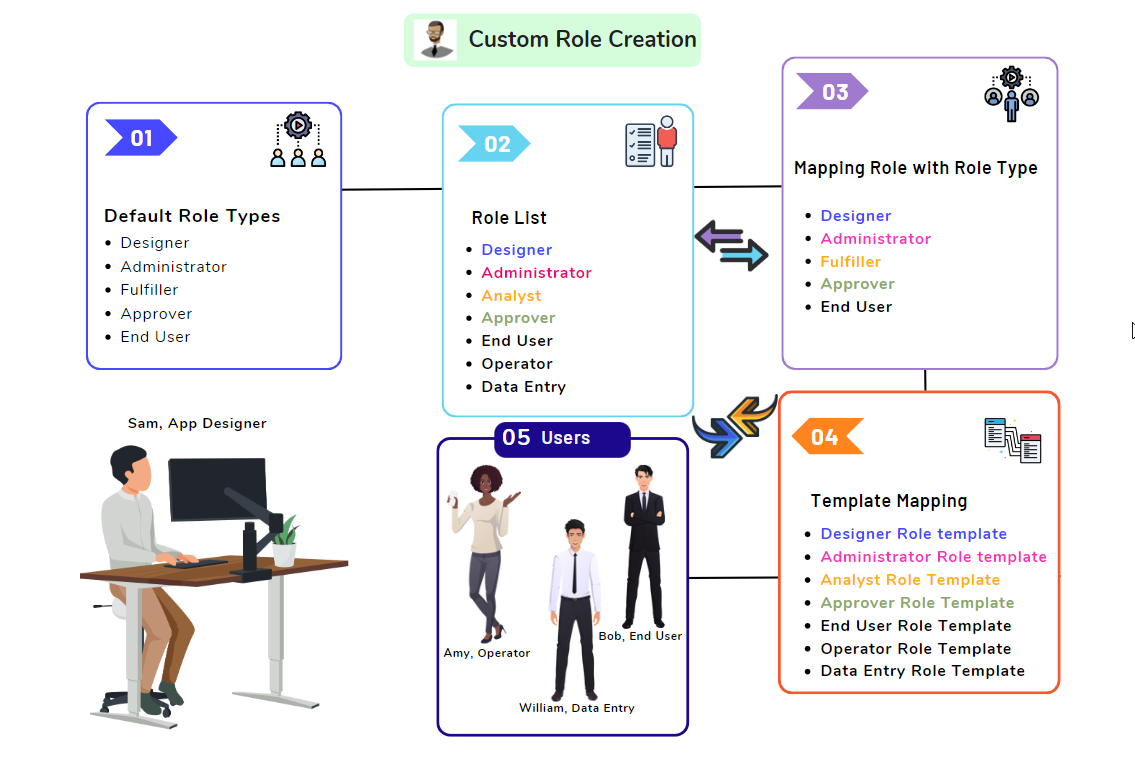
Refer to the table below for more details about the custom **Role** creation capabilities.
| SL No | Description |
| --- | --- |
| 1 | Default **Role Types** are created by system. |
| 2 | Application Designer create additional **Roles**. Example: Operator, Data Entry. |
| 3 | Application Designer maps **Roles** to the **Role Type**. |
| 4 | Application Designer creates additional **Role Templates**. Example: Operator role templates, Data Entry role templates. |
| 5 | Application Designer create users and assign **Roles**. |
User persona: Application Designer
Let's explore the following Use Case for configuring Roles!
| **Use Case** User persona:Application Designer | **Solution** |
| --- | --- |
| John, the Application Designer is tasked with creating **Roles** for an application designed to manage and store sensitive data. **Roles** to be created are **Administrator**, **Data Entry Operator**, and **End User**. | John can implement **Role-Based** **Access Control** (**RBAC**) to ensure secure and controlled data management within the application. This enables users to perform their respective tasks efficiently while maintaining data integrity and security. |
Add Role Types under the Application layer
This section contains the details of the system capabilities under the **Design Studio**.
Note
- Under the **Application** layer, five Role types: User, Fulfiller, Approver, Designer and Administrator are available by default.
**Roles** to **Role type** mapping should be defined as shown in the table. Table: Mapping
| Sl. no | Role | Role Type |
| --- | --- | --- |
| 1 | Designer | Designer |
| 2 | Administrator | Administrator |
| 3 | End User | End User |
| 4 | Approver | Approver |
| 5 | Analyst | Fulfiller |
Note
- Designer, Administrator, End User, Approver, and Analyst role templates are available by default.
Refer to the table for more details. Table: Role Template Mapping
| SL No | Role | Role Type | Role Template |
| --- | --- | --- | --- |
| 1 | Designer | Designer | Designer Role Template |
| 2 | Administrator | Administrator | Administrator Role Template |
| 3 | End User | End User | End User Role Template |
| 4 | Approver | Approver | Approver Role Template |
| 5 | Analyst | Fulfiller | Analyst Role Template |
Note
- You can view roles mapped to the respective role templates at the **Application** level.
#### Configure Roles at Application level
Application Designer create custom New **Roles**, **Role Templates**, and **Users**, and **Map users to Roles**.
To configure **Roles**, perform the following steps:
1. Select Application Designer by clicking on the gear icon on the top menu bar on the **Design Studio** screen.
2. Navigate to **Access Control Center** > **User Roles> Add User**.
3. Click the **Roles** option to load the **Roles** page. The Application Designer is prompted to select **Domain** and **Sub Domain**.
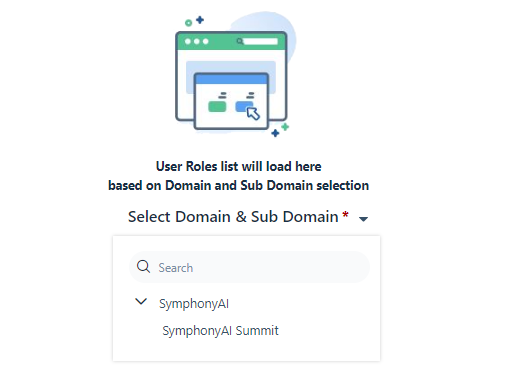Figure: Domain and Sub-Domain
4. Create a new **Role** by clicking **Add Role**. Application Designer can view the properties as shown in the screenshot.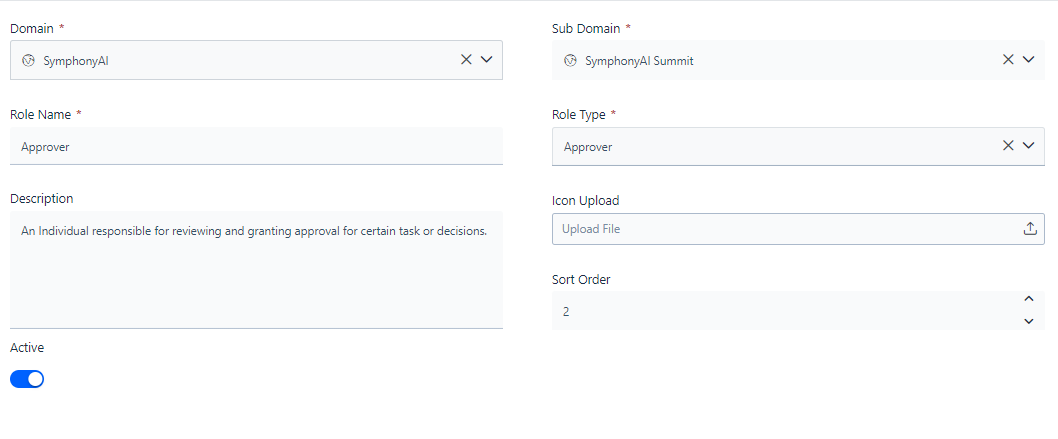 Figure: Roles
5. Select the **Domain** under which you want to create the **Role**. If the Application Designer is a **Sub Domain** user, and then all the domains under the platform will be displayed. If the user is a local **Sub Domain**: then all the **Sub Domains**, in which the user with role creation rights gets displayed. Here **SymphonyAI** and **SymphonyAI Summit** are selected as **Domain** and **Sub Domain** field.
6. Enter the appropriate name in the **Role Name** field. Here **Role Name** is specified as **Approver**.
7. Describe the **Role** in the description text area. The screen shot shows the Description for the Approver.
8. Select the **Role Type** from the drop-down list. Here **Approver** is selected as **Role Type**.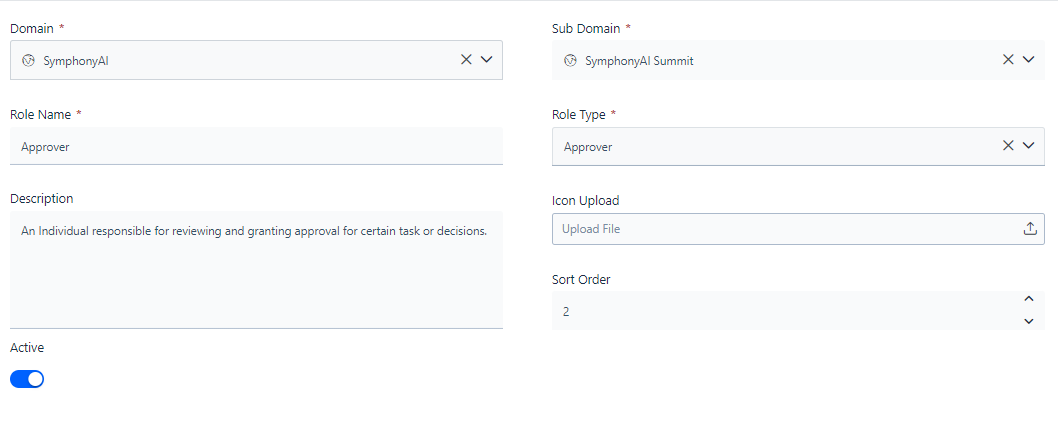Figure: Roles with Role Name
9. Upload an **Icon** to a **Role** using the **Upload Icon** tab. Define the order in which the Role should be displayed on the list page through the **Sort Order** field and keep the **Role** as **Active**. Click **Save** to save the details.