The enhanced Asset Inventory provides administrators and IT Analysts with a centralized interface to manage, monitor, and track enterprise assets throughout their lifecycle. It brings together essential inventory operations, including asset visibility, bulk import, data export, advanced filtering, and configurable list views, helping teams manage large asset inventories more efficiently.
The enhancement also introduces Discovery Info integration, enabling IT Analysts to navigate directly from a mapped Fixed Asset to its corresponding discovered device details. This provides access to hardware, software, network, configuration changes, and vulnerability information without manually searching the Discovery module.
Together, these capabilities improve inventory visibility, simplify asset administration, and help IT teams make informed decisions using consolidated asset and discovery information.
Benefits
Centralized Asset Visibility: View unit-based and quantity-based assets in one place.
Reduced Manual Effort: Import and update multiple asset records through bulk operations.
Improved Inventory Tracking: Monitor purchased, allocated, available, moved, and deactivated quantities.
Faster Asset Retrieval: Locate relevant records using flexible filters.
Personalized Inventory Views: Customize columns and save views based on operational needs.
Let’s explore the following use case.
Use Case User Persona: Analyst | Solution |
At NovaTech, the IT Administration team manages a large inventory of IT assets, including laptops, desktops, and consumables distributed across multiple office locations. The administrator frequently needs to track asset details, monitor allocation and availability, add newly procured assets, update existing inventory records, and prepare inventory reports. Managing these activities across a large number of records creates administrative overhead. Identifying specific assets, tracking quantity-based inventory, and retrieving relevant information for reporting also becomes time-consuming. Additionally, administrators may need different inventory views depending on whether they are monitoring asset allocation, reviewing available stock, or updating asset information. | With the enhanced Asset Inventory, the administrator can access unit-based and quantity-based asset records through a centralized inventory list. When NovaTech procures a new batch of laptops and desktops, the administrator can use Bulk Import to add multiple asset records using the predefined import template. The administrator can also update existing records in bulk and review the Add and Update import history to track previous operations and identify successful or failed records. To monitor inventory levels, the administrator can review Purchase Quantity, Allocated Quantity, Available Quantity, Moved Quantity, and Deactivated Quantity for quantity-based assets. The administrator can filter assets, customize columns, and save views for recurring inventory activities. The administrator can also export the required asset records in CSV or Excel format for offline analysis and reporting. |
View Asset Inventory List page
To view Asset List page, perform the following steps:
Navigate to Asset > Inventory & Lifecycle > Asset Inventory.
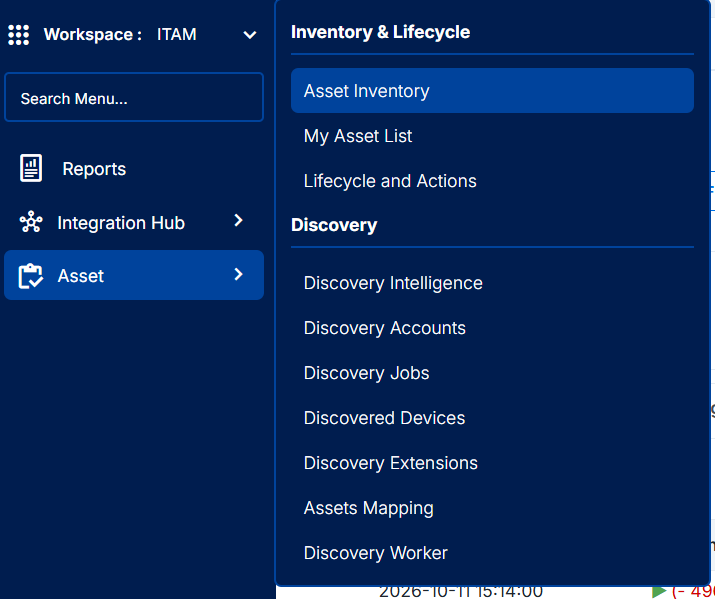
Figure: Asset Inventory
The Asset Inventory list page is displayed.
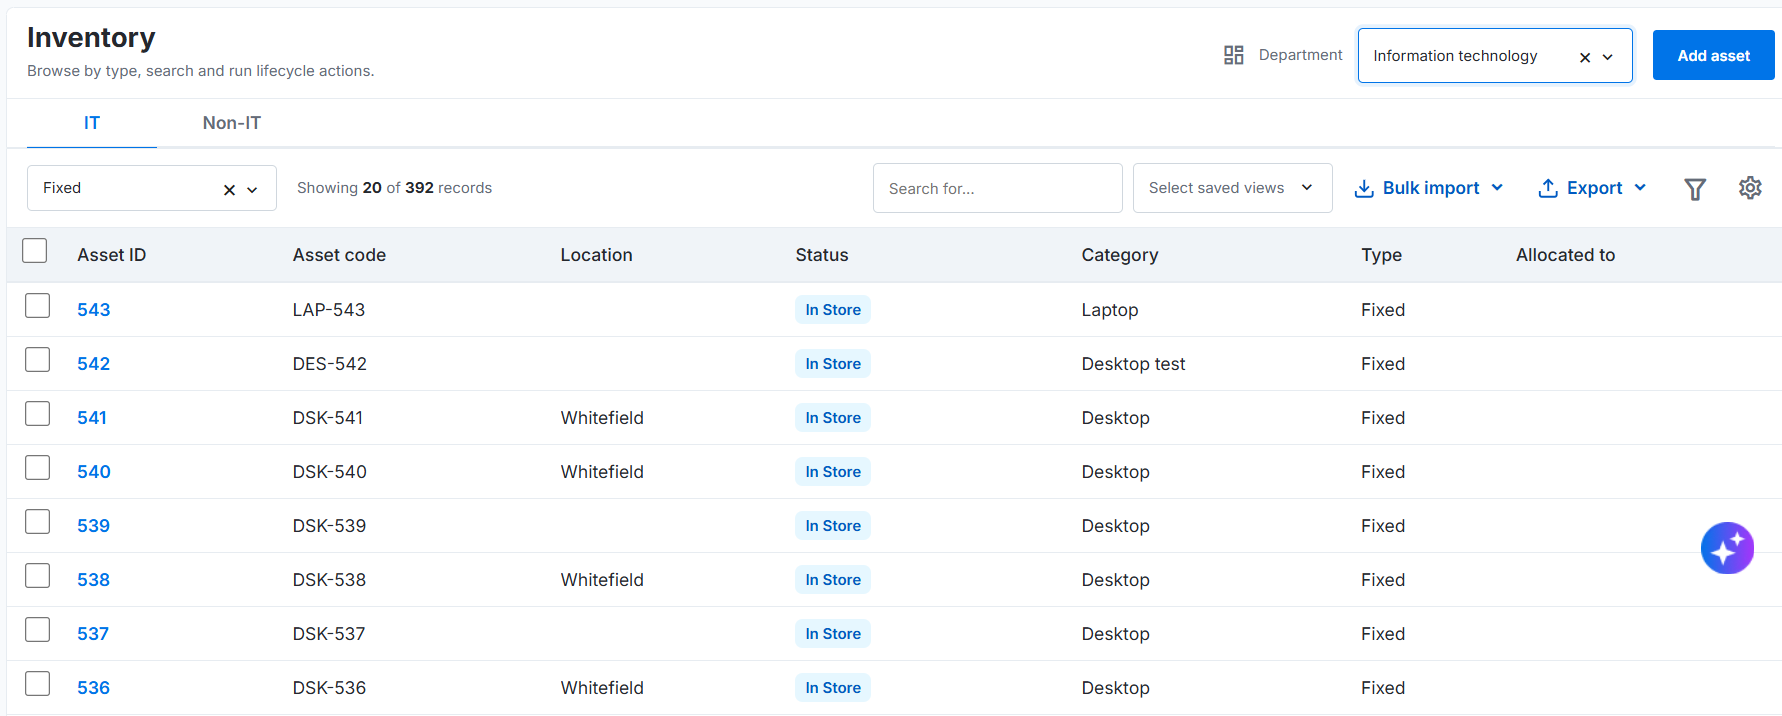
Figure: Asset Inventory List page - Unit based assets
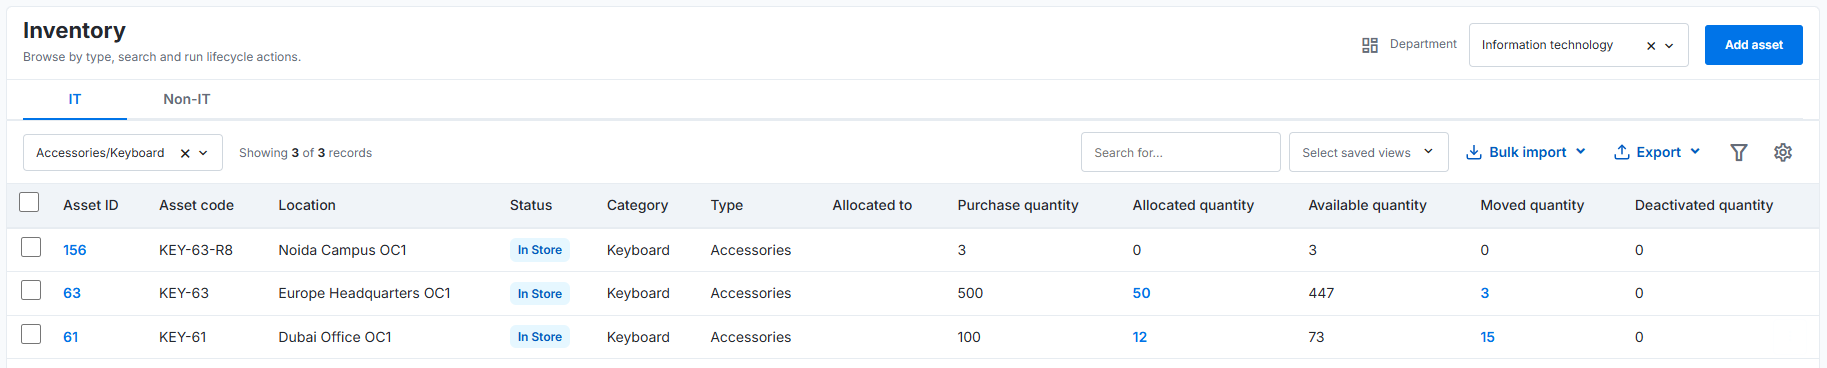
Figure: Asset Inventory List page - quantity based assets
The following table describes the fields on Asset List Columns page:
Field | Description |
|---|---|
Select Checkbox | Select individual asset records for performing supported bulk operations. The header checkbox allows users to select all displayed records. |
Asset ID | Displays the unique identifier assigned to the asset. Select the ID to open the corresponding asset record. |
Asset code | Displays the unique code assigned to the asset for identification and tracking. |
Location | Displays the physical location associated with the asset. |
Status | Displays the asset's current lifecycle status, such as In Store, Allocated, or In Repair. |
Category | Displays the category to which the asset belongs, such as Laptop, Desktop, or other asset categories. |
Type | Indicates the asset type, such as Fixed or Consumable. |
Allocated To | Displays the user or employee to whom the asset is currently allocated, where applicable. |
Purchase Quantity | Displays the total quantity of assets purchased or recorded for the selected asset record. |
Allocated Quantity | Displays the total quantity of assets currently allocated to users or employees. |
Available Quantity | Displays the quantity of assets currently available for allocation or use. |
Moved Quantity | Displays the quantity of assets moved from their original location to another location. |
Deactivated Quantity | Displays the quantity of assets that have been deactivated and are no longer available for active use. |
The columns Purchase Quantity, Allocated Quantity, Available Quantity, Moved Quantity and Deactivated Quantity is visible only for quantity-based assets.
Actions
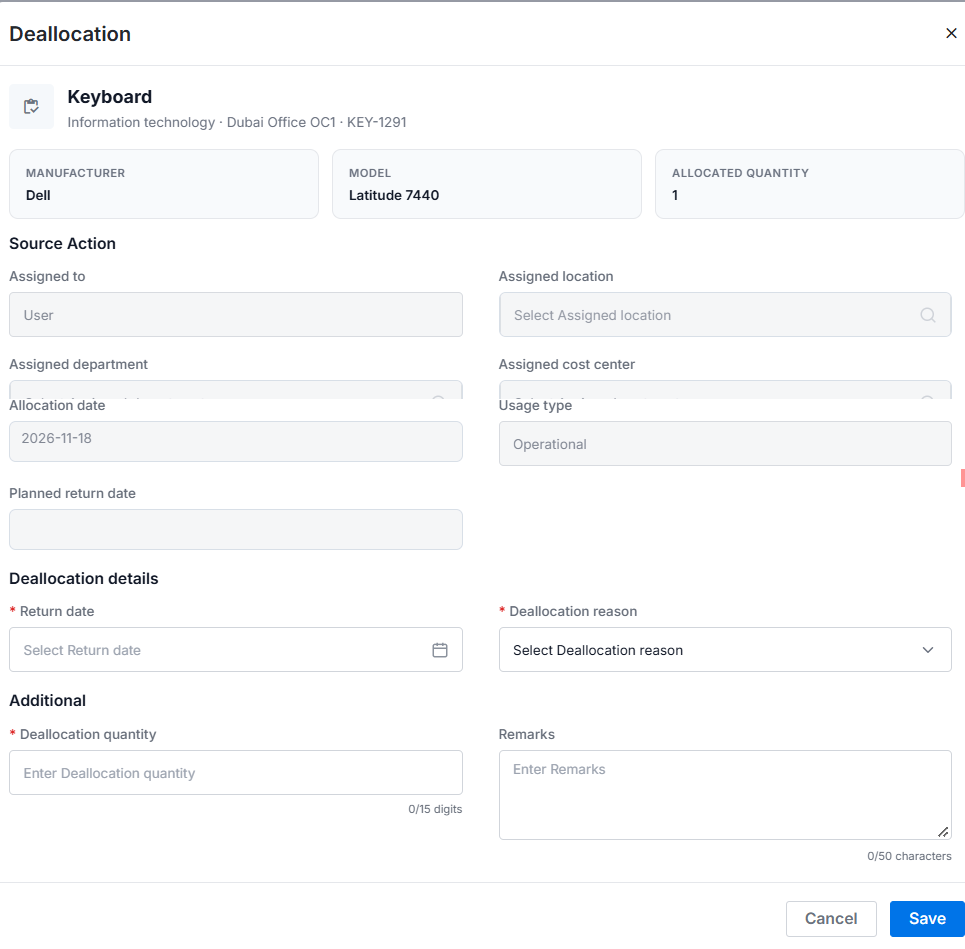
Allocated Quatity
The Deallocation action allows ITAM analysts to return allocated assets to inventory by recording the return details. When an analyst clicks the Allocated Quantity value on the Asset Inventory list page, the Deallocation pop-up opens with the asset and allocation details prefilled, including the asset name, manufacturer, model, allocated quantity, assigned user, location, department, cost center, allocation date, and usage type.
The analyst can enter the Return Date, select a Deallocation Reason, specify the Deallocation Quantity, and add optional remarks. After entering the required details, the analyst can save the form to complete the deallocation.
Key benefit: Simplifies asset returns by providing allocation context and capturing the details required to process deallocation from the Asset Inventory page.
Screenshot - Deallocation pop-up
Moved Quantity
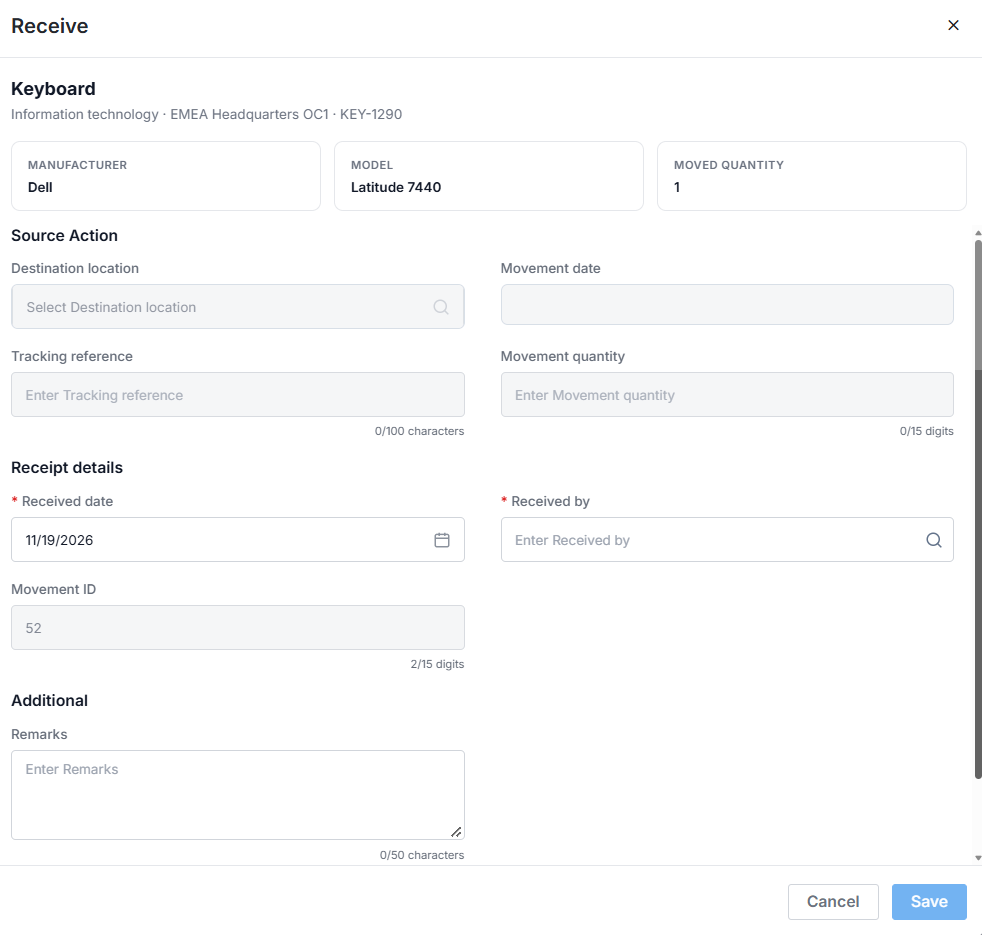
The Receive action allows ITAM analysts to record the receipt of assets moved to a destination location. When an analyst clicks the Moved Quantity value on the Asset Inventory list page, the Receive pop-up opens with the asset details prefilled, including the asset name, manufacturer, model, and moved quantity.
The analyst can enter or select the Destination Location, Movement Date, Tracking Reference, and Movement Quantity under Source Action. Under Receipt Details, the analyst must provide the Received Date and Received By details. The Movement ID is displayed for reference, and the analyst can add optional remarks before saving the receipt.
Key benefit: Simplifies asset receipt by allowing analysts to record destination, movement, and receipt details directly from the Asset Inventory page.
Screenshot - Receive
Available Quantity
Bulk Import
The Bulk Import feature enables administrators to import multiple asset records into the Inventory at once, reducing the effort involved in creating asset records individually. Administrators can use the provided import template to prepare asset data, upload the file, and initiate the import process.
The feature also provides an import history, allowing administrators to review previous bulk import operations under the Add and Update tabs.
Import Assets in Bulk
To perform import assets in Bulk, perform the following steps:
Navigate to the Inventory list page and click Bulk Import to initiate the asset import process.
 Figure: Bulk Import
Click Upload File to select and upload the file containing the asset information.
 Figure: Bulk Import Options
The Import Asset pop-up page appears. Under the General tab, specify the required import details. These details help configure the asset import operation. Click Next to proceed to the upload stage.
 Figure: Import asset - General
Under the Upload section, download the provided import template. Use this template to organize and enter the asset information in the required format. Once the asset data is prepared, upload the completed file and click Add to initiate the bulk import operation.
 Figure: Import asset - Upload
The application processes the uploaded file to perform the bulk asset import.
View Bulk Import History
The application maintains a history of bulk import operations, allowing administrators to review previously initiated asset import activities.
To view the import history, perform the following steps:
Navigate to the Bulk Import option from the Inventory list page.
Open the History section to view the recorded import operations.
Use the Add and Update tabs to view the respective bulk import history.
Add: Displays the history of bulk operations performed to add asset records.
Update: Displays the history of bulk operations performed to update existing asset records.
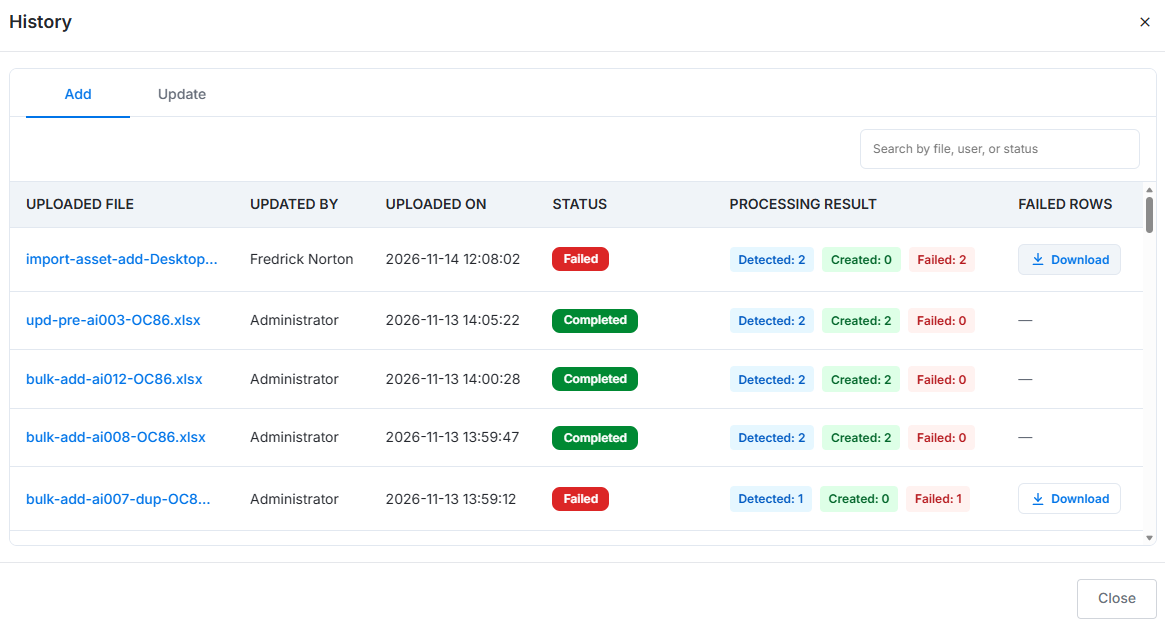
Figure: History
Reviewing the import history helps administrators track asset import activities and refer to previous Add and Update operations and to identify successful and failed records.
Export
The Export option enables users to download asset inventory records in a file format for offline access, reporting, analysis, and record-keeping. Users can export asset information directly from the Asset Inventory list page, making it easier to review, share, and maintain asset data outside the application.
Click Export to open the export pop-up, where users can specify the export requirements and initiate the download.
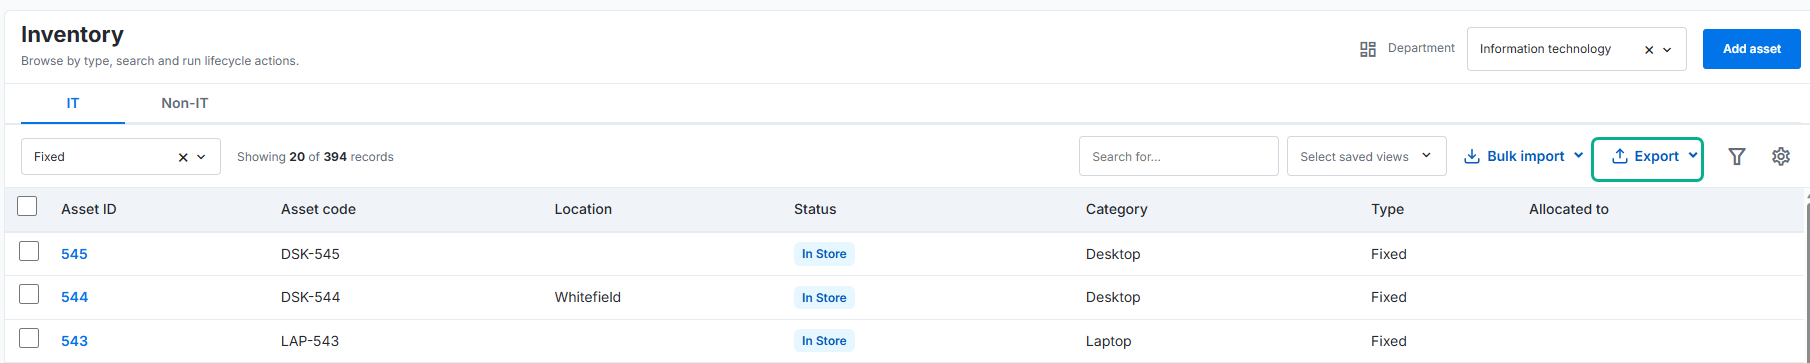
Figure: Export Option
To export asset records, perform the following steps:
Navigate to the Asset Inventory list page.
Click Export to open the export pop-up.
Review the available export options (CSV or Excel) and select the required preferences, if applicable.
Click the appropriate action to initiate the export.
Download the generated file and access the exported asset records for further use.
 Figure: Export pop-up page
Filter
The Filter option enables users to narrow down the asset records displayed on the Asset Inventory list page based on specific criteria. It helps users quickly locate relevant assets without manually navigating through the entire inventory.
Users can apply filters based on available asset attributes to view records that match their requirements. This makes it easier to identify assets with specific properties, monitor asset statuses, and perform inventory-related activities efficiently.
To filter asset records, perform the following steps:
Navigate to the Asset Inventory list page.
Click Filter to open the filter panel.
 Figure: Filter
Select the required filter criteria from the available fields.
 Figure: Filters and custom view
Specify the values based on which you want to narrow down the asset records.
Apply the filters to display only the matching records.
Review the filtered results and refine the criteria, if required.
Click Save as View option allows users to customize the columns displayed on the Asset Inventory list page. Users can select the relevant fields they want to see, helping them organize asset information according to their requirements.
This is particularly useful when users work with large inventories and need to focus on specific information, such as asset details, ownership, classification, or status, without displaying unnecessary columns.
Configure Columns
The Configure Columns option allows users to customize the Asset Inventory list page by selecting which columns should be displayed in the inventory table. It provides flexibility to organize asset information based on individual requirements and operational needs.
Users can choose the relevant fields they want to view and hide columns that are not required for their current activity. This helps keep the inventory table organized, improves readability, and makes it easier to access important asset information without navigating through unnecessary details.
To configure table columns, perform the following steps:
Navigate to the Asset Inventory list page.
 Figure: Configure columns
Click Configure Columns to open the column configuration pop-up.
 Figure: Configure table columns
Review the available columns in the pop-up.
Select the columns you want to display in the inventory table.
Deselect the columns that you do not want to display.
Click Save to update the inventory table.
For L3 level attribute, configure column has maximum limit for 25 attributes.
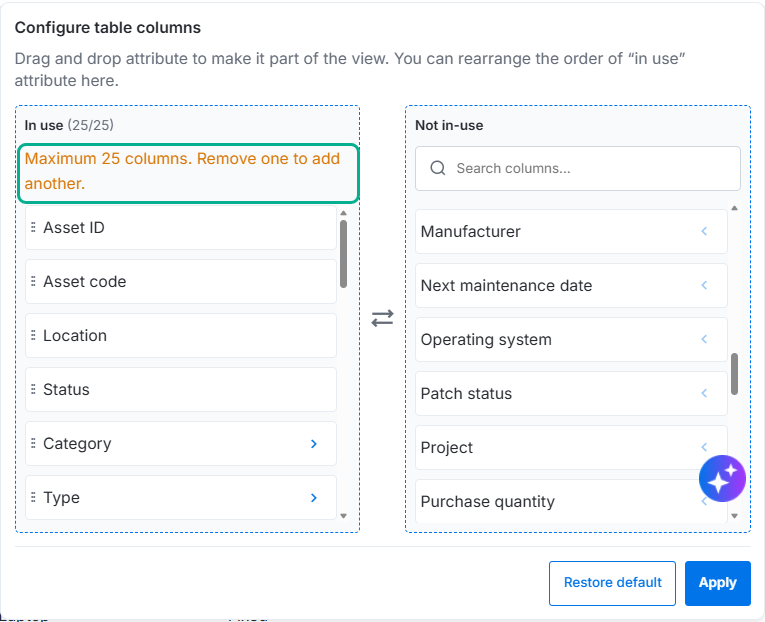
Figure: L3 attributes column limit
For single category selection, configure column has maximum limit for 50 attributes.
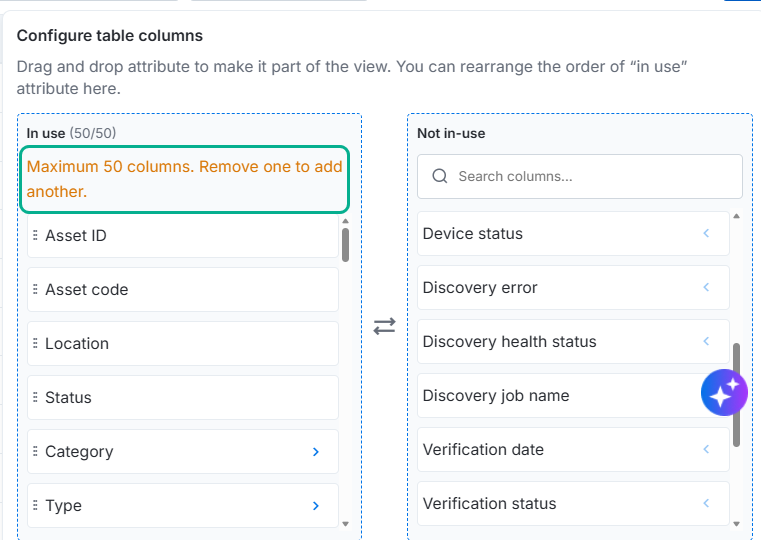
Figure: Single Category level column limit
View Discovered Device Details for Mapped Assets
The Asset Management module now provides visibility into hardware and software devices discovered and mapped to Fixed Assets or Configuration Items (CIs). IT Analysts can view discovery-related information directly from the mapped asset's details page, including the device serial number, discovery status, first and last discovered dates, and discovery job name.
The Discovery Info option provides direct access to the corresponding discovered device's details page, allowing analysts to view its complete discovery information without manually searching for the device.
Note
The Discovery Info button is displayed for assets created from discovered devices, regardless of the asset creation method. This includes:
Manual Creation: Assets manually created from the Discovered Device Details page.
Auto Sync: Assets automatically created or synchronized through the discovery process.
Manual Asset Creation: Assets created manually from the Discovered Device List page.
The following flow captures the complete navigation and button visibility behavior.
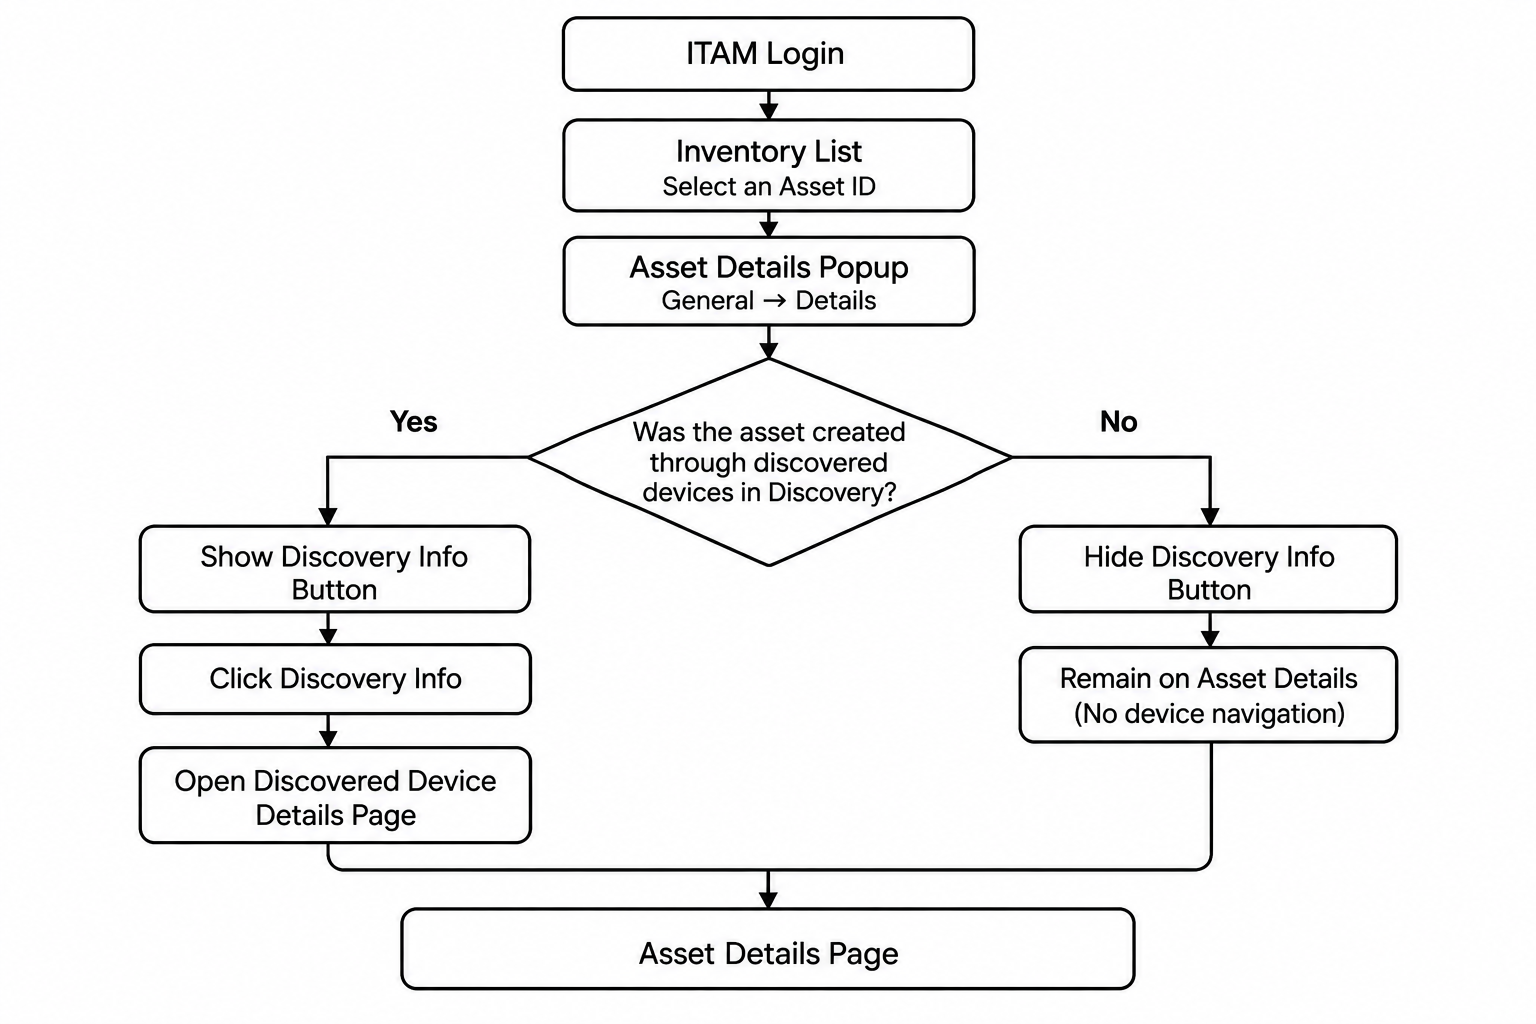
Key Benefits
Quick Access to Discovery Details: Navigate directly from an asset record to its associated discovered device without manually searching the Discovery module.
Improved Asset Visibility: View detailed hardware, software, network, and vulnerability information associated with discovered devices.
Simplified Troubleshooting: Access device-level discovery information to investigate asset discrepancies and device-related issues.
Seamless Navigation: Move between Asset Details and Discovered Device Details using the integrated navigation.
Let’s explore the following use case.
Use Case User Persona: Analyst | Solution |
At Novatech, an IT Analyst receives a report that an employee's laptop is experiencing performance issues. While reviewing the laptop's Fixed Asset record, the analyst needs to verify its hardware configuration, installed software, network details, and other discovery information. Analyst had to navigate separately to the Discovery module and manually search for the corresponding device using its serial number or other identifiers. This increased investigation time and made it difficult to correlate asset information with discovered device details. | With the Discovery Info feature, the IT Analyst can open the laptop's Asset Details popup from the Inventory List and access its associated discovered device directly using the Discovery Info button. By clicking the button, the analyst is redirected to the discovered device details page, where they can review its hardware configuration, installed software, network information, discovery score, and vulnerabilities. The analyst can quickly correlate the asset record with its discovered device information, investigate potential hardware or software issues, and make informed decisions without manually searching across modules. |
Viewing Discovered Assets
To view discovered assets, perform the following steps:
Navigate to Asset > Inventory and Lifecycle > Asset Inventory. The Inventory List displays asset records based on the selected department and applicable filters. Each record includes a clickable Asset ID.
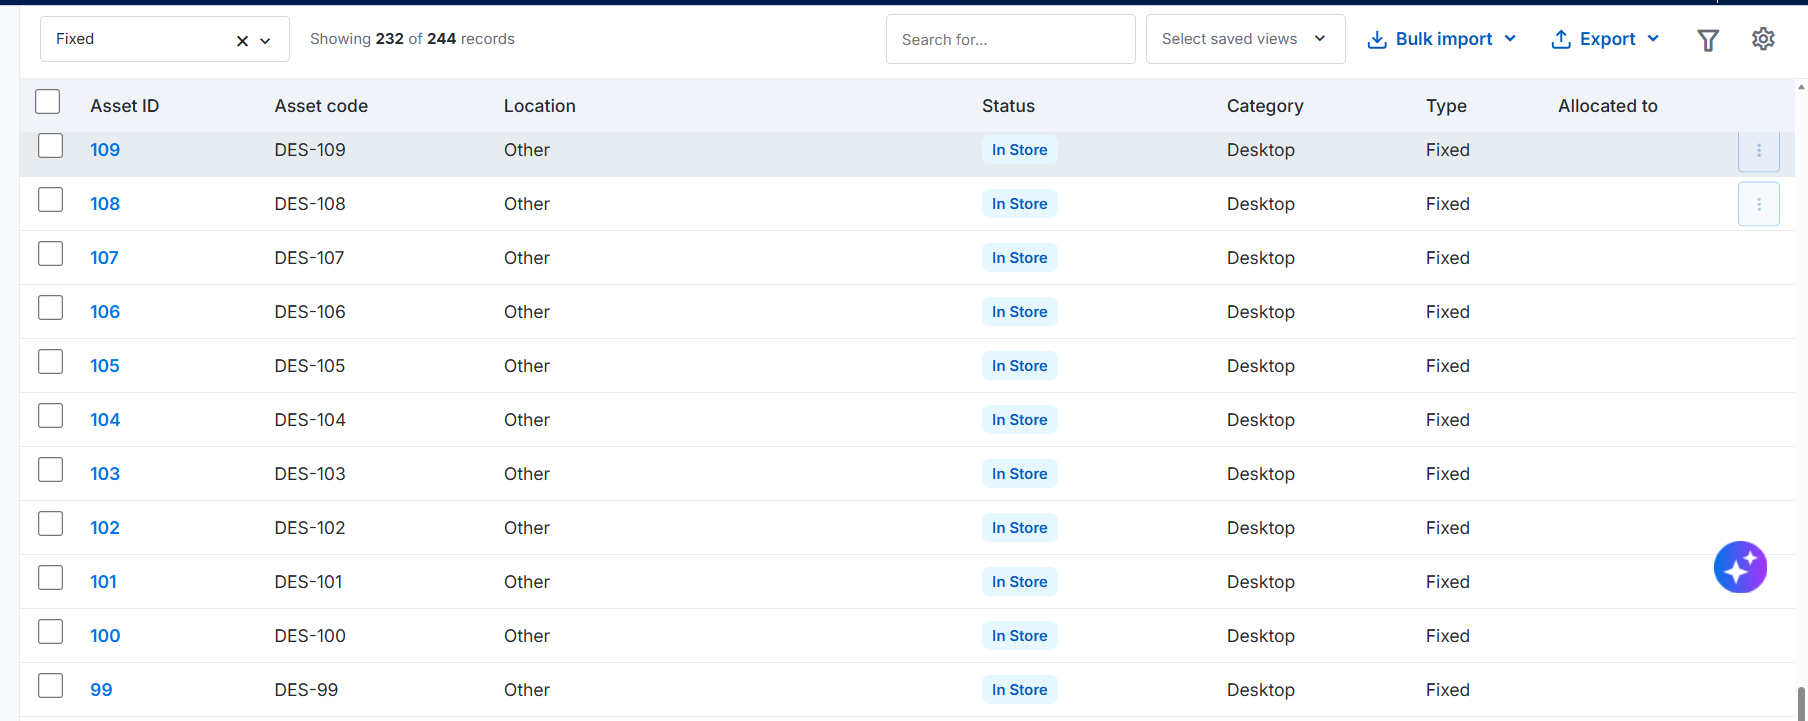
Figure: Asset Inventory List PageClick an Asset ID to open the Asset Details popup. The popup displays the General tab with the Details form selected by default and Discovery Info button.
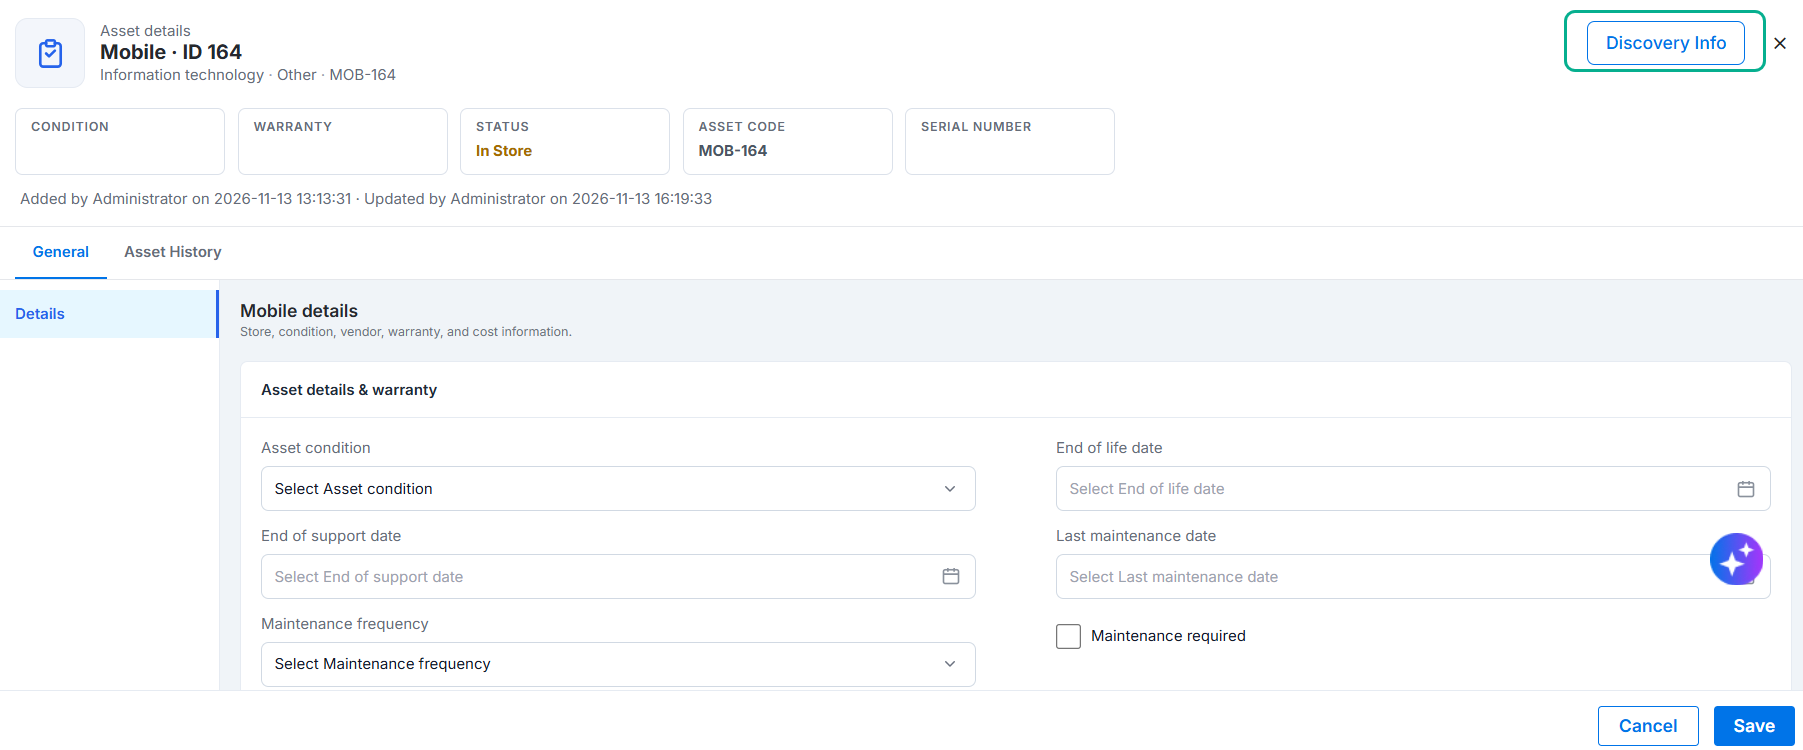
Figure: Asset Details - Discovery InfoClick Discovery Info to navigate from the asset record to its associated discovered device. The system closes the Asset Details popup, discards any unsaved changes in the asset form and retrieves the discovered device. The Discovered device details page gets open in the same browser tab.
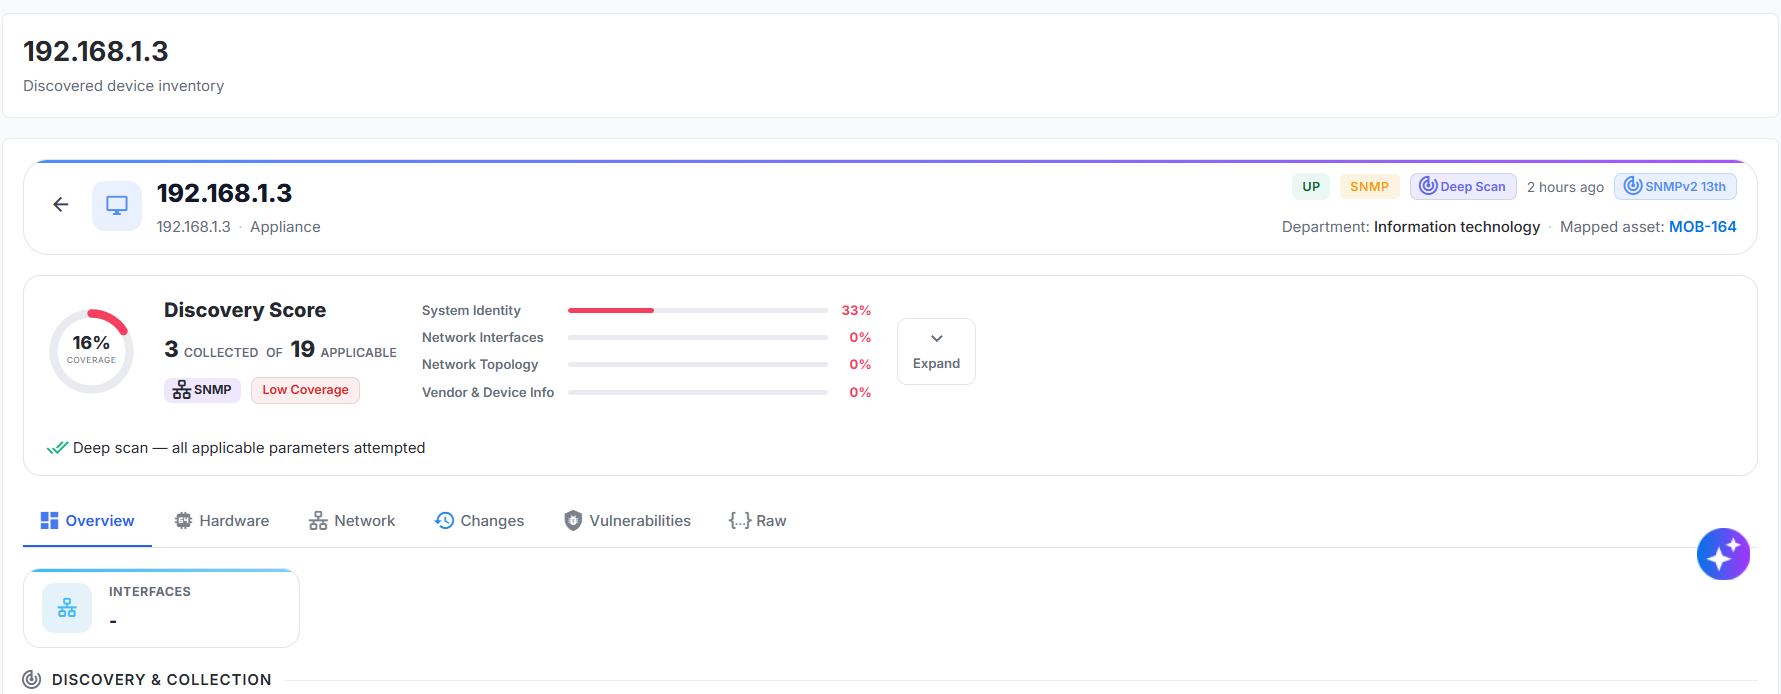
Figure: Discovered Device Details page
The following table describes the fields on the Discovered device details page.Field
Description
Device Header
Displays the primary identification details of the discovered device, including device name, IP address, Fully Qualified Domain Name (FQDN), manufacturer, and device type. Helps IT Analysts identify the device and verify its identity against the mapped asset record.
Hardware Summary
Provides a high-level summary of the device's hardware configuration, including CPU cores, RAM capacity, disk devices, Network Interface Cards (NICs), and processor information. Helps analysts quickly assess the device's hardware specifications without navigating through individual sections.
Discovery Score
Displays the overall discovery score associated with the device. Provides an at-a-glance indication of the device's discovery information and helps analysts assess its discovery completeness based on the platform's scoring mechanism.
Overview
Provides a consolidated view of the discovered device's general information and key attributes. Helps analysts understand the device's identity and overall discovery profile.
Hardware
Displays detailed information about the hardware components identified during discovery, such as processors, memory, storage devices, and network interfaces. Helps analysts verify hardware configurations and investigate asset-related discrepancies.
Software
Displays information about the software components and applications identified on the discovered device. Helps analysts review installed software and validate the software inventory associated with the device.
Network
Displays the device's network-related information, including available network attributes and connectivity details collected during discovery. Helps analysts examine network configurations and identify device-level network information.
Changes
Provides visibility into changes identified in the discovered device's information over time. Helps analysts track modifications to device attributes and understand how the device configuration has evolved across discovery cycles.
Vulnerabilities
Displays vulnerability information identified for the discovered device. Helps analysts review potential security exposures and identify devices that may require further security assessment or remediation.
Raw
Displays the raw discovery data collected from the device. Helps technical teams inspect the underlying discovery information for detailed analysis, validation, and troubleshooting.