Discovery Extensions enable administrators to customize how Discovery collects and stores device information. Use this feature when the standard discovery library does not collect a required attribute, returns an unsuitable value, or returns output that requires other processing.
A Discovery extension groups one or more commands into a Command set for a specific Protocol and optionally, a discovered operating system. During a Discovery scan, the system runs enabled commands from the applicable command set and stores the returned values according to the selected Trigger.
Discovery Extensions support the following protocols:
SSH
WMI
SNMP
Key Benefits
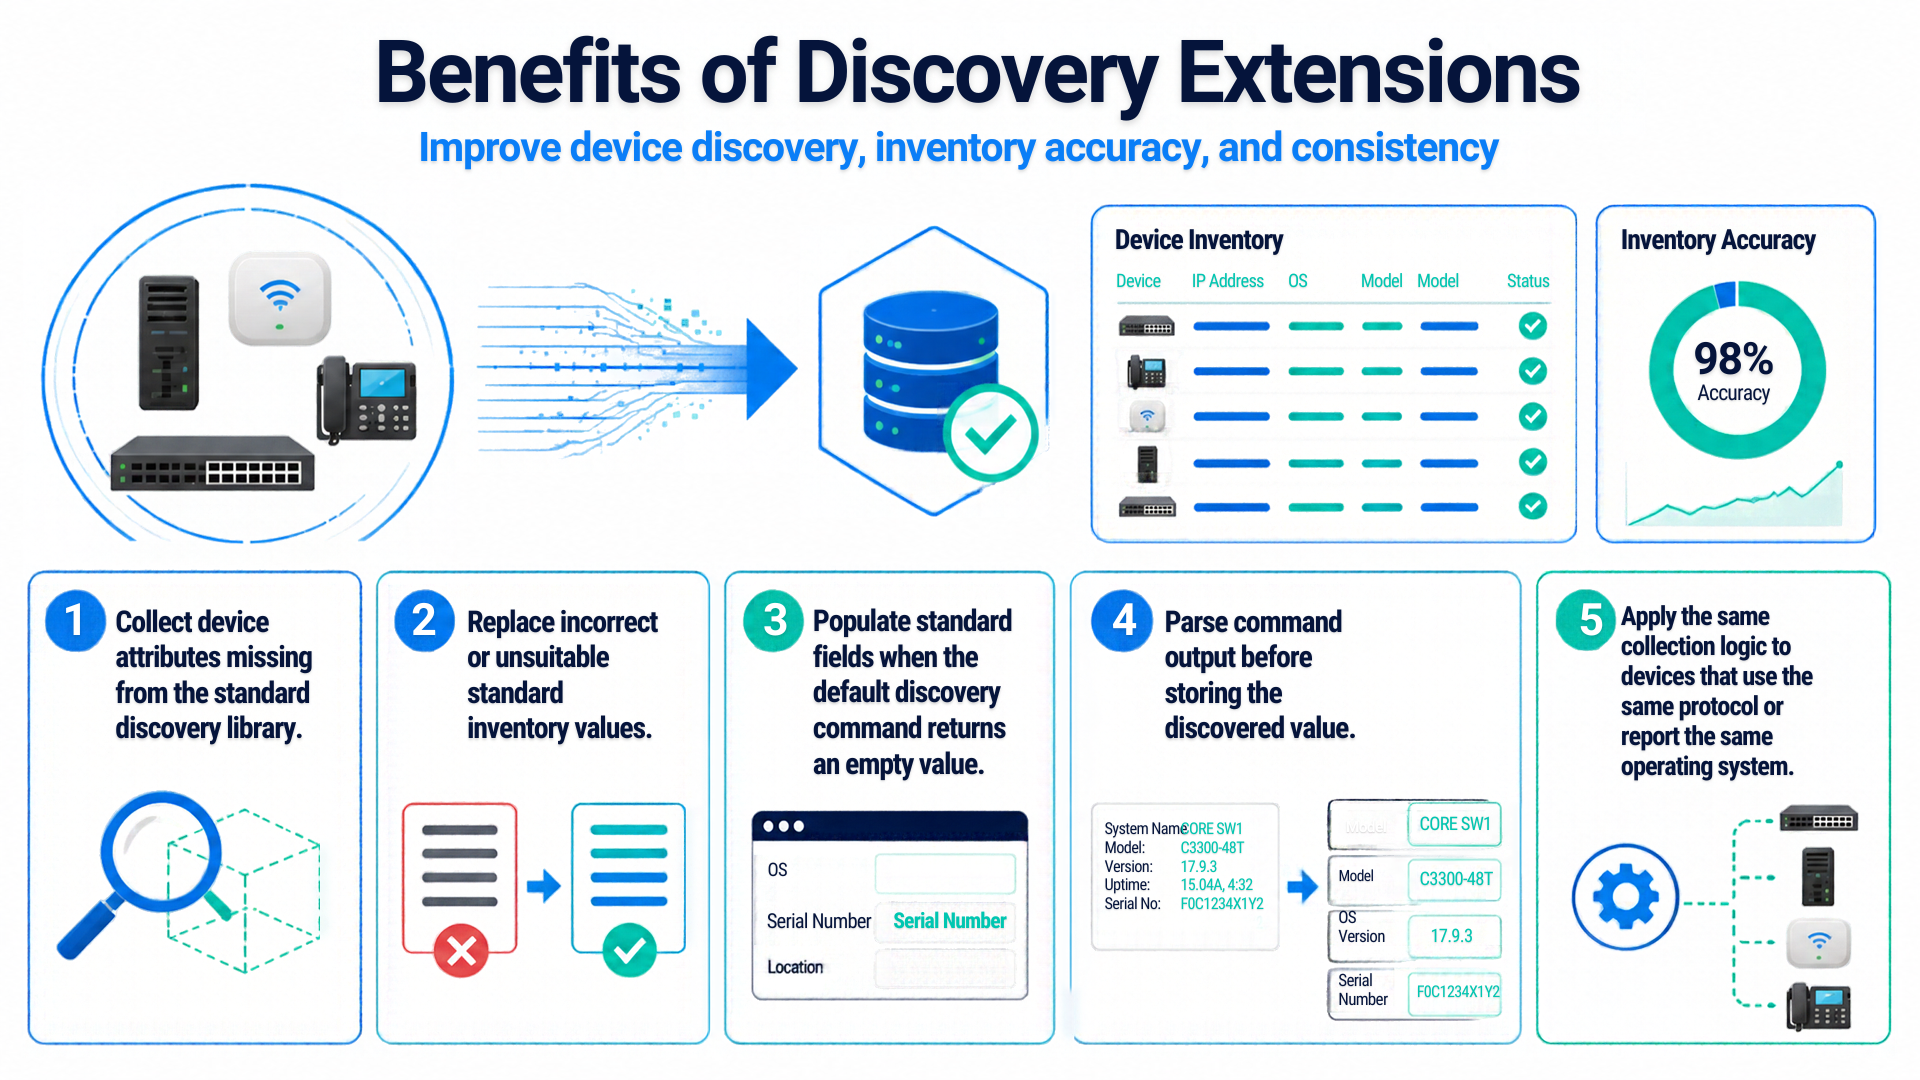
Collect device attributes that the standard discovery library does not provide.
Replace incorrect or unsuitable standard inventory values.
Populate standard fields when the default discovery command returns an empty value.
Parse command output before storing the discovered value.
Apply the same collection logic to devices that use the same protocol or report the same operating system.
Use Case User Persona: Admin | Solution |
|---|---|
NovaTech Technologies manages network and server assets whose standard discovery results do not include every attribute needed for operations. Its administrator needs to collect extra values consistently without changing the standard discovery library. | NovaTech uses Discovery Extensions to add protocol-specific commands that collect or update the required device information. How NovaTech extends discovery?
|
Configure Discovery Extensions
To access Discovery Extensions, perform the following:
Log in as an administrator.
Navigate to ITAM > Asset > Discovery > Discovery Extensions. The application displays Discovery Extensions list page. For more information, refer Discovery Extension List Page.
 Figure: Discovery Extension List Page
Click + Add Command Set to create a new command set for the protocol.
Discovery Extensions list page
Use the list page to review, filter, enable, edit, or remove command sets. You can also expand a command set to review its commands.
Protocol filters
Use the protocol tabs above the list to filter command sets:
All Protocols displays all command sets.
SSH displays command sets that run shell commands through SSH.
WMI displays command sets that use WMI.
SNMP displays command sets that retrieve values through SNMP OIDs.
The number beside each protocol indicates the number of command sets available for that protocol.
List page columns
Column | Description |
|---|---|
Set Name | Displays the name assigned to the command set. Select the expand arrow to view the commands in the set. |
Protocol | Displays the protocol used by the command set: SSH, WMI, or SNMP. |
OS Filter | Displays the discovered operating system values to which the command set applies. A blank OS filter means that the command set applies to all targets that use the selected protocol. |
Commands | Displays the total number of commands and a summary of their trigger types. For example, New ×1 indicates one command that creates a custom attribute. |
Enabled | Enables or disables the complete command set. Disabled command sets do not run during discovery. |
Expanded command details
Expand a command set to see each configured command and how Discovery handles its result. For example, the rows below show a WMI command that collects a system name, an SNMP command that reads an operating system value, and an SSH command that collects an FQDN.
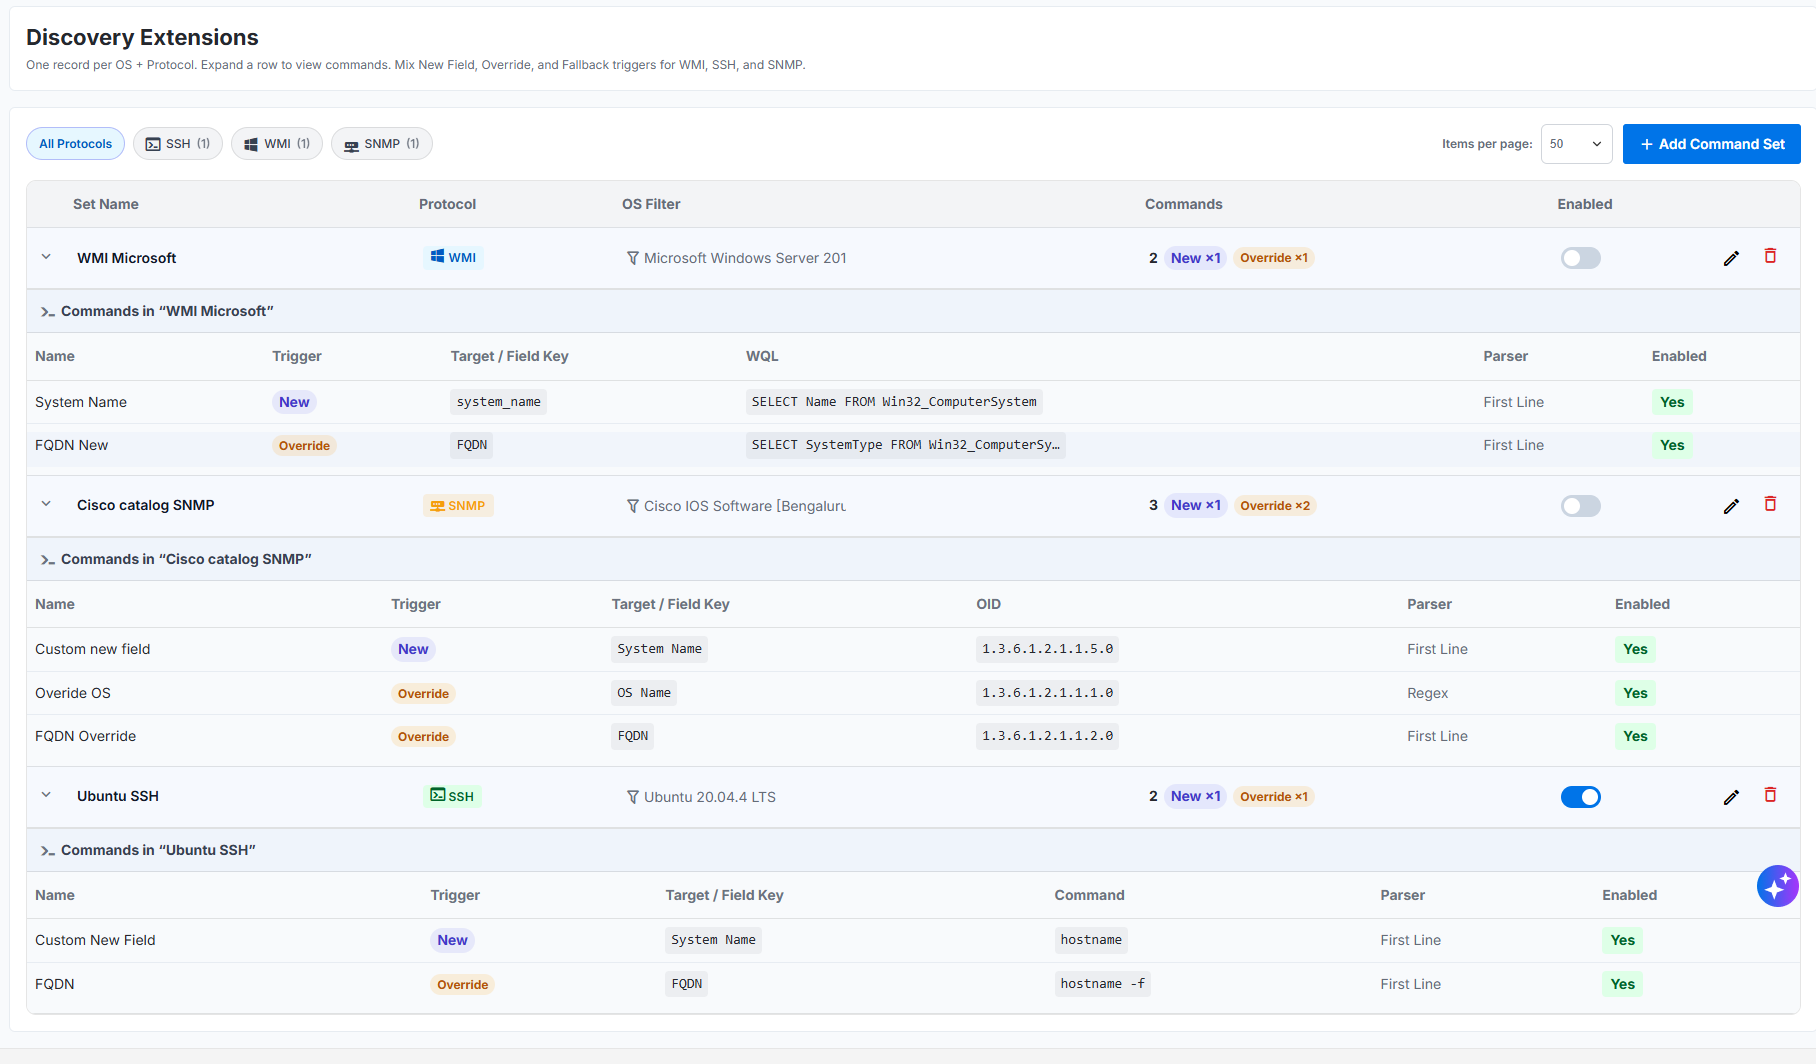
Figure: List Page Protocol Expansion
WMI column | Description |
|---|---|
Name | Identifies the command’s purpose. For example, System Name or FQDN. |
Trigger | Indicates how Discovery stores the result. For example, New adds a custom attribute, while Override replaces a standard field value. |
Target / Field Key | Names the destination for the result. A New command can use system_name as its custom field key; an Override command can target FQDN. |
WQL | Contains the WMI query Discovery runs. For example, SELECT Name FROM Win32_ComputerSystem retrieves the system name. |
Parser | Determines how Discovery extracts the value from the query result. For example, First Line keeps the first line. |
Enabled | Yes means Discovery runs the command during a matching scan; disable it to keep the configuration without running it. |
SNMP column | Description |
|---|---|
Name | Identifies the command’s purpose, such as Custom new field, Override OS, or FQDN Override. |
Trigger | Indicates how Discovery stores the result. For example, New adds a custom attribute and Override replaces a standard field value. |
Target / Field Key | Names the destination for the result. Examples include System Name for a custom attribute or OS Name for an overridden standard field. |
OID | Contains the numeric SNMP object identifier Discovery queries. For example, 1.3.6.1.2.1.1.5.0 returns the system name on devices that support it. |
Parser | Determines how Discovery extracts the value from the SNMP response. Examples include First Line and Regex. |
Enabled | Yes means Discovery runs the command during a matching scan; disable it to keep the configuration without running it. |
SSH column | Description |
|---|---|
Name | Identifies the command’s purpose, such as Custom New Field or FQDN. |
Trigger | Indicates how Discovery stores the result. For example, New adds a custom attribute, while Override replaces a standard field value. |
Target / Field Key | Names the destination for the result. For example, System Name can be a custom field, while FQDN can be a standard field. |
Command | Contains the shell command Discovery runs on the target. For example, hostname returns the host name and hostname -f requests its fully qualified domain name. |
Parser | Determines how Discovery extracts the value from the command output. For example, First Line keeps the first line. |
Enabled | Yes means Discovery runs the command during a matching scan; disable it to keep the configuration without running it. |
List page actions
Action | Description |
|---|---|
Expand | Expands the command set to display its commands. |
Edit | Opens the command set so that you can update its details or commands. |
Delete | Removes the command set. |
Items per page | Controls the number of command sets displayed on the page. |
Add Command Set | Opens the New Command Set dialog. |
Caution: Deleting a command set removes its configuration. Disabling a command set retains the configuration without applying it during discovery.
Add a command set
A command set defines the protocol, target operating systems, and commands that Discovery uses to collect or update values.
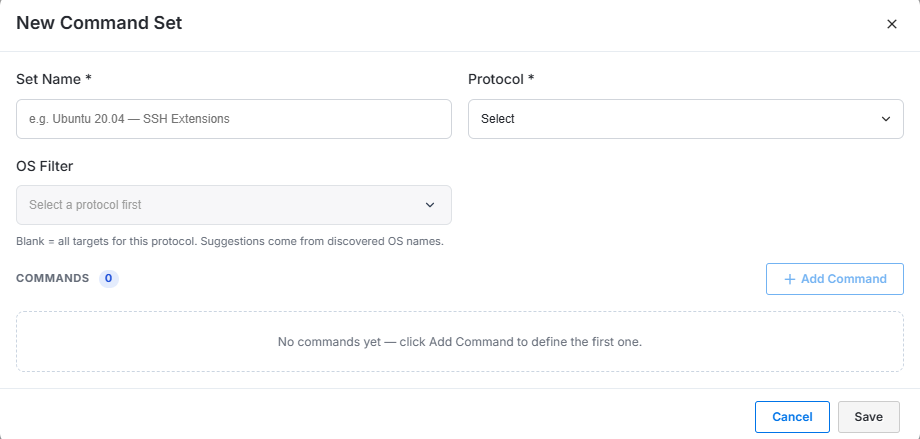
Figure: Add Command Set
To add a command set, perform the following steps:
Click Add Command Set on the Discovery Extensions page.
In Set Name, enter a descriptive name for the command set.
In Protocol, select SSH, WMI, or SNMP. The + Add Command button becomes enabled only after you select a protocol.
In OS Filter, select one or more discovered OS values, if required.
Click Add Command to define the extension. For more information, refer Add Command Set.
Configure the command fields displayed for the selected protocol.
Add more commands if the command set must collect or update many values.
Enable each command that must run.
Click Save.
Note
Select the appropriate OS Filter for each command set, and create only one command set for each protocol and OS flavor. Do not create duplicate templates for the same protocol and OS.
Command set fields
Field | Description |
|---|---|
Set Name | Enter a unique, recognizable name. Include the protocol, vendor, device family, OS, or purpose where appropriate. For example, SSH Extension or Cisco SNMP Catalog. |
Protocol | Select the protocol that Discovery uses to run the commands. The protocol determines which command fields appear. The available protocols are WMI, SSH and SMTP |
OS Filter | Select one or more OS values reported by discovered devices. Based on the selected Protocol OS versions display in this field. Leave the field blank to apply the command set to all targets that use the selected protocol. |
Commands | Displays the number of commands in the command set. Click Add Command to define a command. |
Note: Select the protocol before selecting an OS filter. Discovery suggests OS names that it found during earlier device scans.
Add a command
Click Add Command in the New Command Set dialog to add a command panel. New commands run by default and initially populates with the New Field value in the Trigger field, change this value if required.
Common command controls
Control | Description |
|---|---|
Expand or collapse | Shows or hides the command configuration. |
Enabled | Controls whether the individual command runs during discovery. |
Remove | Removes the command from the command set. |
Common command fields
Field | Description |
|---|---|
Command Name | Enter a short, descriptive label that identifies the value or purpose of the command. |
Trigger | Select New Field, Override, or Fallback. The selection determines the target field configuration. For more information, refer Trigger Types. |
Output Parser | Select how Discovery processes the command output before storing the value. For example, First Line stores only the first line of the output. For more information, refer Parser Output |
The remaining fields depend on the selected Protocol and Trigger.
Trigger types
Each command uses a trigger that determines how Discovery stores the returned value.
Trigger | Description | Result |
|---|---|---|
New Field | Collects an attribute that is not mapped to a standard inventory field. | The value appears under Custom Attributes on the discovered device details page. |
Override | Always replaces the value of the selected standard inventory field. | The custom value appears in the selected standard field. |
Fallback | Populates the selected standard inventory field only when the default discovery command returns an empty value. | The standard value remains unchanged when available. |
Note
A command that uses New Field does not add a field to the standard device details layout. The collected value appears under Custom Attributes. In the following example Custom Attribute is set as “System Name”. When you view this on the discovered devices, you can see this under the Custom Attributes.
Configure a WMI command
Use a WMI command to query information from a Windows device. Enter a WQL SELECT statement that is valid in the remote WMI namespace.
Create a custom attribute with WMI
When you select New Field - add as custom attribute in Trigger, configure the following fields:
Field | Description |
|---|---|
Command Name | Enter a short label for the command, such as BIOS Serial Number. |
Trigger | Select New Field - add as custom attribute. |
Custom Attribute Key | Enter the key used to store the value under Custom Attributes, such as custom_machine_id. |
WQL Query | Enter a WQL SELECT statement. For example, SELECT SerialNumber FROM Win32_BIOS requests the BIOS serial number. |
WQL Result Column | Enter the column whose value Discovery should store, such as SerialNumber. Leave this field blank to use the first column returned by the query. |
Output Parser | Select how Discovery processes the selected result before storing it. For example, First Line keeps the first line. |
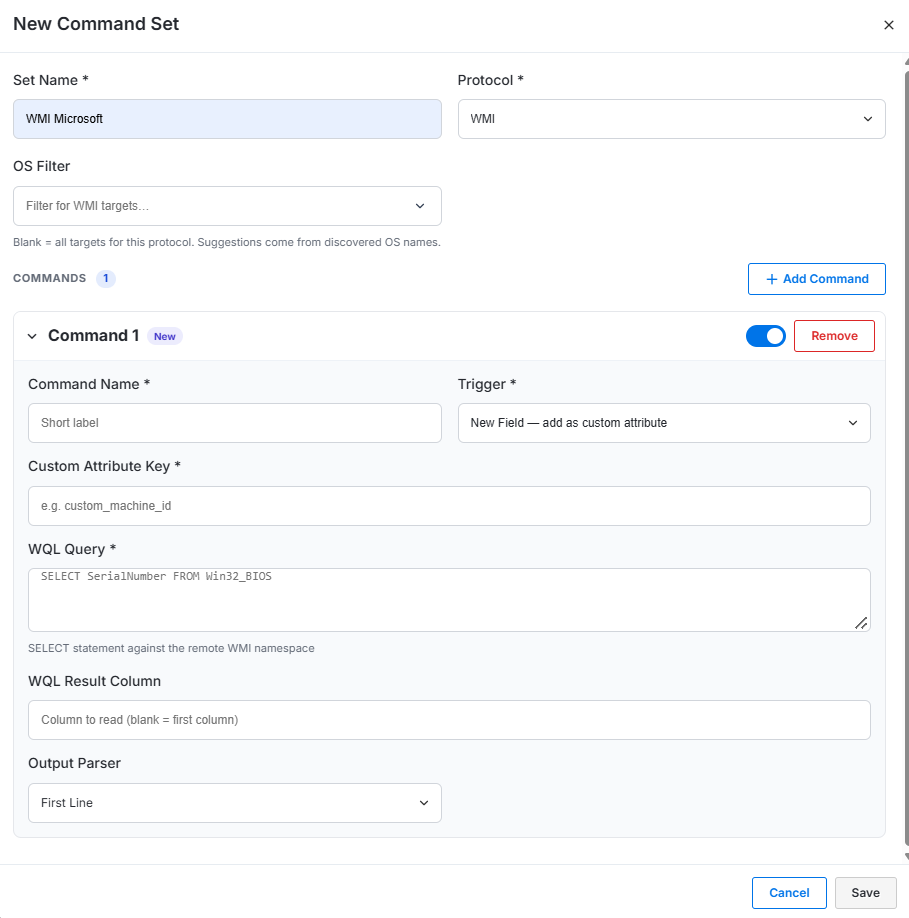
Figure: New Field - WMI
Set a WMI standard field
For Override and Fallback, configure the same WMI query fields. The only difference is the trigger behavior: Override always replaces the selected standard field, while Fallback populates it only when the default value is empty.
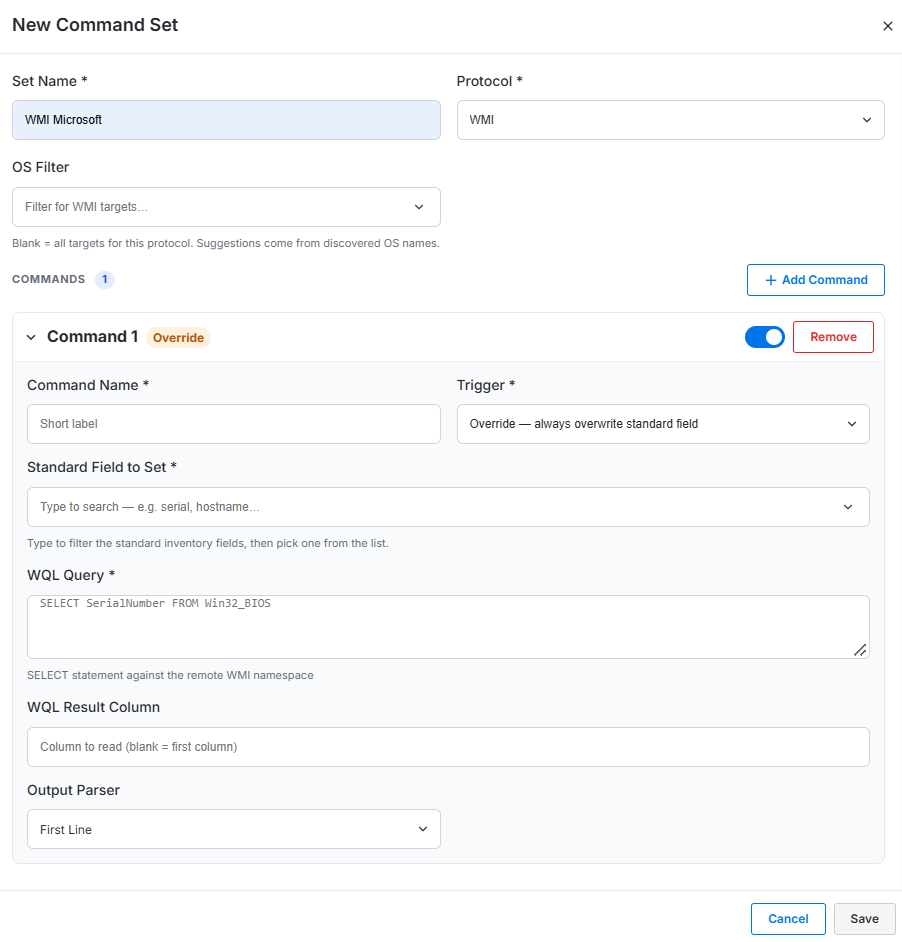
Figure: WMI Fallback/Override
Enter a Command Name and select Override or Fallback in Trigger.
Select the destination in Standard Field to Set.
Enter a WQL SELECT statement in WQL Query, such as SELECT SerialNumber FROM Win32_BIOS.
Enter the result column in WQL Result Column, or leave it blank to use the first column returned.
Select an Output Parser, if required, and enable the command.
Save the command set.
Configure an SSH command
Use an SSH command to run a shell command or pipeline supported by the remote operating system.
Create a custom attribute with SSH
When you select New Field - add as custom attribute in Trigger, configure the following fields:
Field | Description |
|---|---|
Command Name | Enter a short label for the command. |
Trigger | Select New Field - add as custom attribute. |
Custom Attribute Key | Enter the key used to store the value under Custom Attributes. Use a clear key such as custom_machine_id. |
Shell Command | Enter a shell command or pipeline supported by the remote OS. For example, cat /etc/os-release | grep PRETTY_NAME. |
Output Parser | Select the parser that extracts the required part of the command output. |
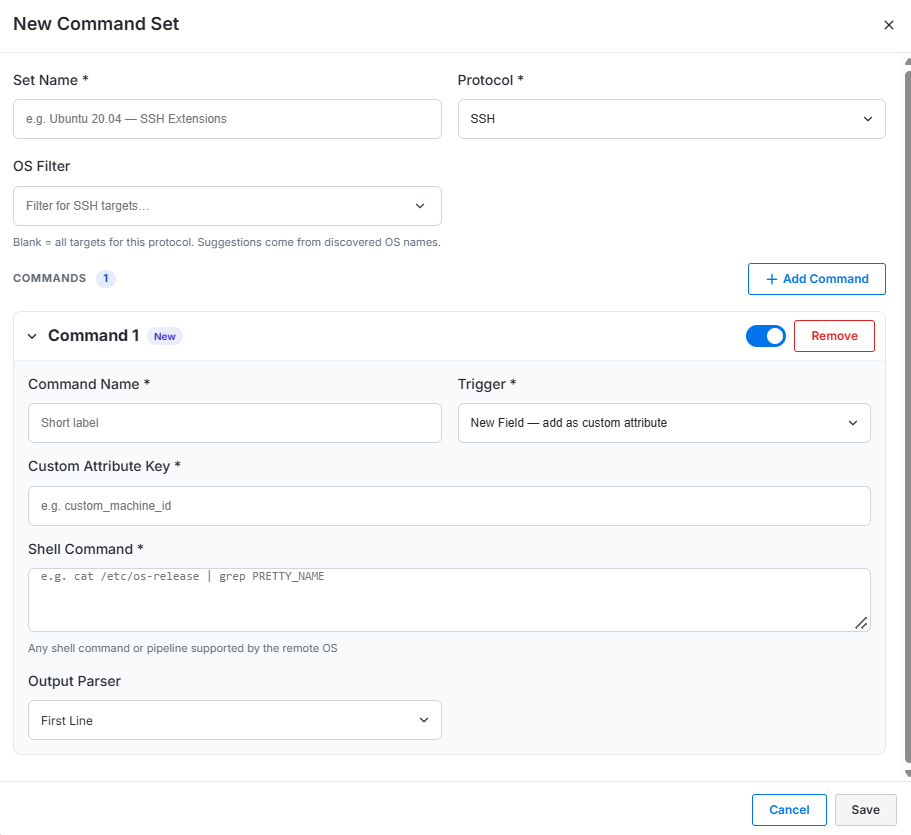
Figure: New Field - SSH
Set an SSH standard field
For Override and Fallback, configure the same SSH command fields. The only difference is the trigger behavior: Override always replaces the selected standard field, while Fallback populates it only when the default value is empty.
Field | Description |
|---|---|
Command Name | Enter a short label for the command, such as FQDN. |
Trigger | Select Override or Fallback. |
Standard Field to Set | Select the standard inventory field to update, such as node.fqdn. |
Shell Command | Enter a shell command supported by the remote OS. For example, hostname -f returns the fully qualified domain name on systems that support this option. |
Output Parser | Select how Discovery processes the command output before storing the value. For example, First Line keeps the first line. |
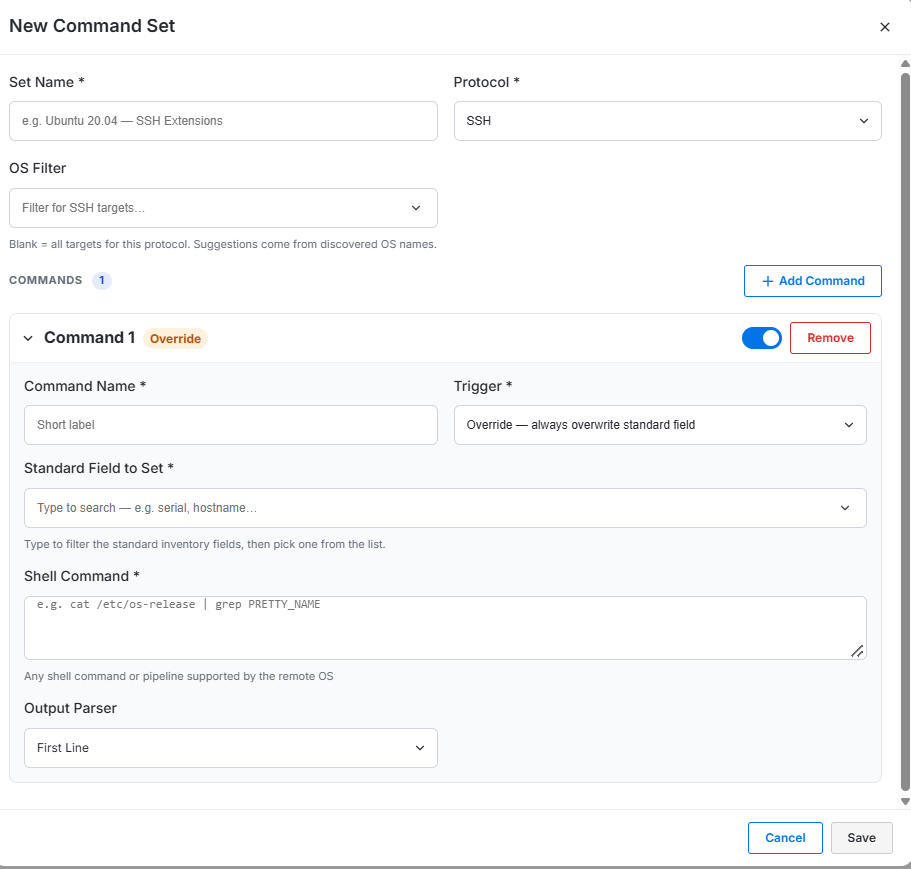
Figure: Overvide/Fallback - SSH
Configure Override and Fallback commands
Use Override or Fallback when you need to save the returned value to an existing standard inventory field.
Add or open a command.
Enter a Command Name.
Select one of the following triggers:
Override to always replace the standard field value.
Fallback to set the standard field only when the default value is empty.
Select the target in Standard Field to Set.
Enter the protocol-specific command, query, or OID.
Select an Output Parser, if required.
Enable the command.
Save the command set.
For example, select node.fqdn as the standard field when a custom command must replace or populate the device FQDN.
Configure an SNMP command
SNMP command sets retrieve values from an SNMP agent by querying numeric OIDs. Unlike SSH and WMI commands, SNMP commands do not use shell commands or WQL queries.
Create a custom attribute with SNMP
When you select New Field - add as custom attribute in Trigger, configure the following fields:
Field | Description |
|---|---|
Command Name | Enter a short label for the command, such as System Description. |
Trigger | Select New Field - add as custom attribute. |
Custom Attribute Key | Enter the key used to store the value under Custom Attributes, such as system_description. |
SNMP OID | Enter the numeric OID that Discovery sends in an SNMP GET request. For example, 1.3.6.1.2.1.1.1.0 requests the system description from devices that support it. |
Output Parser | Select how Discovery processes the returned value before storing it. For example, First Line keeps the first line. |
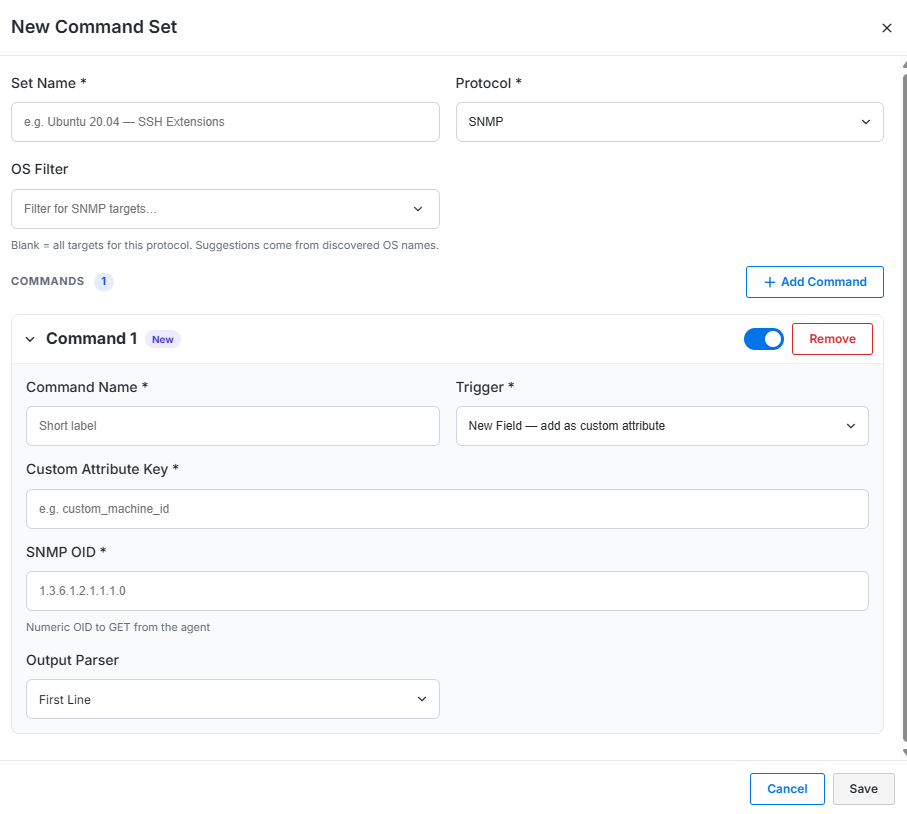
Figure: New Field - SNMP
Set an SNMP standard field
For Override and Fallback, configure the same SNMP fields. The only difference is the trigger behavior: Override always replaces the selected standard field, while Fallback populates it only when the default value is empty.
Field | Description |
|---|---|
Command Name | Enter a short label for the command, such as System Description. |
Trigger | Select Override or Fallback. |
Standard Field to Set | Select the standard inventory field that matches the value returned by the OID. |
SNMP OID | Enter the numeric OID that Discovery sends in an SNMP GET request. For example, 1.3.6.1.2.1.1.1.0 requests the system description from devices that support it. |
Output Parser | Select how Discovery processes the returned value before storing it. For example, First Line keeps the first line. |
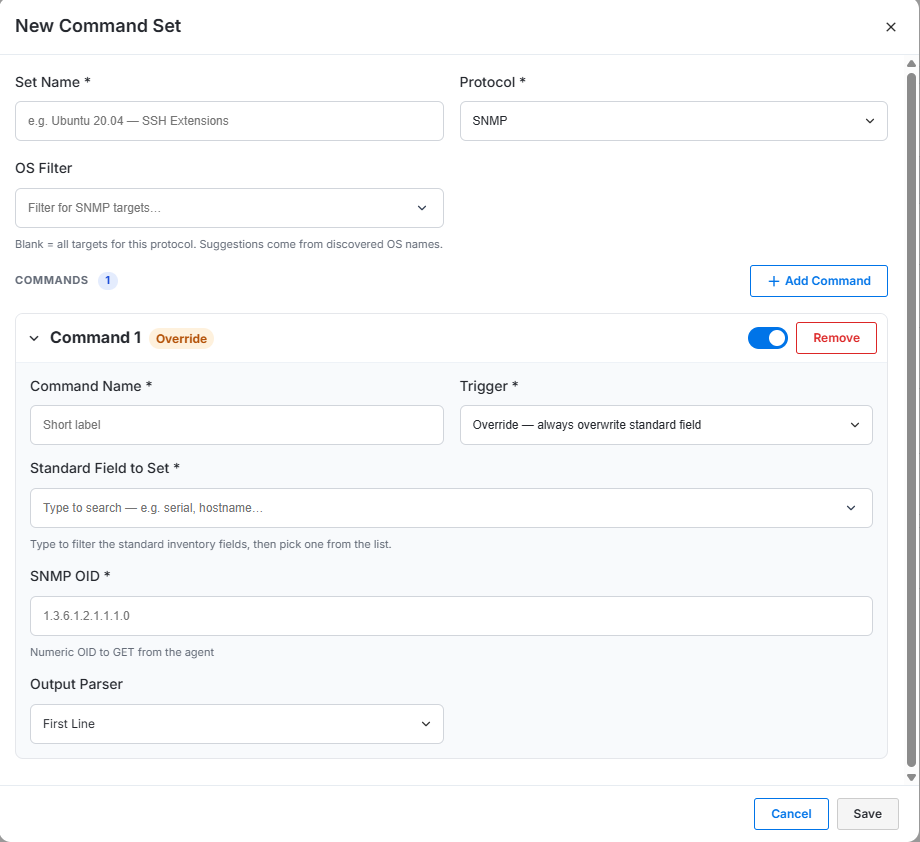
Figure: Override/Fallback - SNMP
Before using an OID in production, confirm that the OID returns the required value on each applicable device model and OS version.
Parse command output
The Output Parser applies to results returned by SSH commands, WMI queries, and SNMP OIDs. For WMI, Discovery first reads the selected WQL Result Column; if that field is blank, it reads the first column returned by the query. Discovery then applies the selected parser to the result before storing it.
Choose from these parser options:
Parser | What it does |
|---|---|
First Line | Keeps the first line of the result. |
Last Line | Keeps the last line of the result. |
Full Output | Keeps the complete result. |
Regex | Extracts text that matches a regular expression. |
JSON Path | Selects a value from a JSON result using a path expression. |
For example, if a command, query, or OID returns more than one line and the required value is on the last line, select Last Line. This option works with results from any of the three protocols.
Save a command set
The Save button becomes available after all required command set and command fields contain valid values.
Before saving, verify that:
Set Name is descriptive and unique.
Protocol matches the target devices.
OS Filter is correct or intentionally blank.
No other command set targets the same protocol and OS flavor.
Every command has a name and a trigger.
Each protocol-specific command, query, or OID is valid.
Each New Field command has a custom attribute key.
Each Override or Fallback command has a standard target field.
Enable required commands.
Click Cancel to close the dialog without saving the configuration.
Verify a discovery extension
After creating or updating a command set:
Run a discovery job that includes a device matching the command set protocol and OS filter.
Navigate to the discovered device details page.
Confirm that the latest data collection completed successfully.
Verify the result based on the trigger:
For New Field, review Custom Attributes.
For Override, review the selected standard field and confirm that the custom value replaced the previous value.
For Fallback, verify the selected standard field on a device where the default value is empty.
Compare the stored value with the expected command, query, or OID output.
Run discovery again after modifying a command set. Existing inventory values do not reflect the updated configuration until an applicable discovery scan processes the device.
Manage command sets
From the Discovery Extensions list page, you can:
Filter command sets by protocol.
Expand a command set to review its commands.
Enable or disable a complete command set.
Edit the OS filter or command configuration.
Add commands to an existing command set.
Disable an individual command without removing its configuration.
Delete commands or command sets that are no longer required.
Best practices
Name command sets by protocol, vendor, device family, OS, or purpose.
Use the narrowest applicable OS filter to prevent commands from running on unintended devices.
Leave OS Filter blank only when the command set must apply to every target using the selected protocol.
Use stable, unique custom attribute keys and consistent naming conventions.
Check shell commands, WMI queries, and SNMP OIDs on representative devices before broad deployment.
Use Override only when the custom result must replace the standard value.
Use Fallback when the standard discovery value must remain authoritative whenever available.
Review raw output before selecting a parser.
Disable a command set when you need to stop processing but keep the configuration.
Rerun discovery and verify the result after every configuration change.