The Network tab allows you to create and manage credential profiles for discovering devices through the following methods:
Discovery Method | Description |
|---|---|
Uses Windows Management Instrumentation credentials to connect to Windows devices through a domain account or local account. | |
Uses a password or private key to connect to Linux and Unix devices. | |
Uses SNMPv1, SNMPv2c, or SNMPv3 credentials to connect to supported network devices. |
Discovery jobs use these credential profiles to authenticate with target devices and retrieve device information. Create separate profiles when devices use different credentials, authentication methods, Departments, or protocol versions.
Note
Before testing a credential profile, ensure that an active Discovery Worker can communicate with the target device.
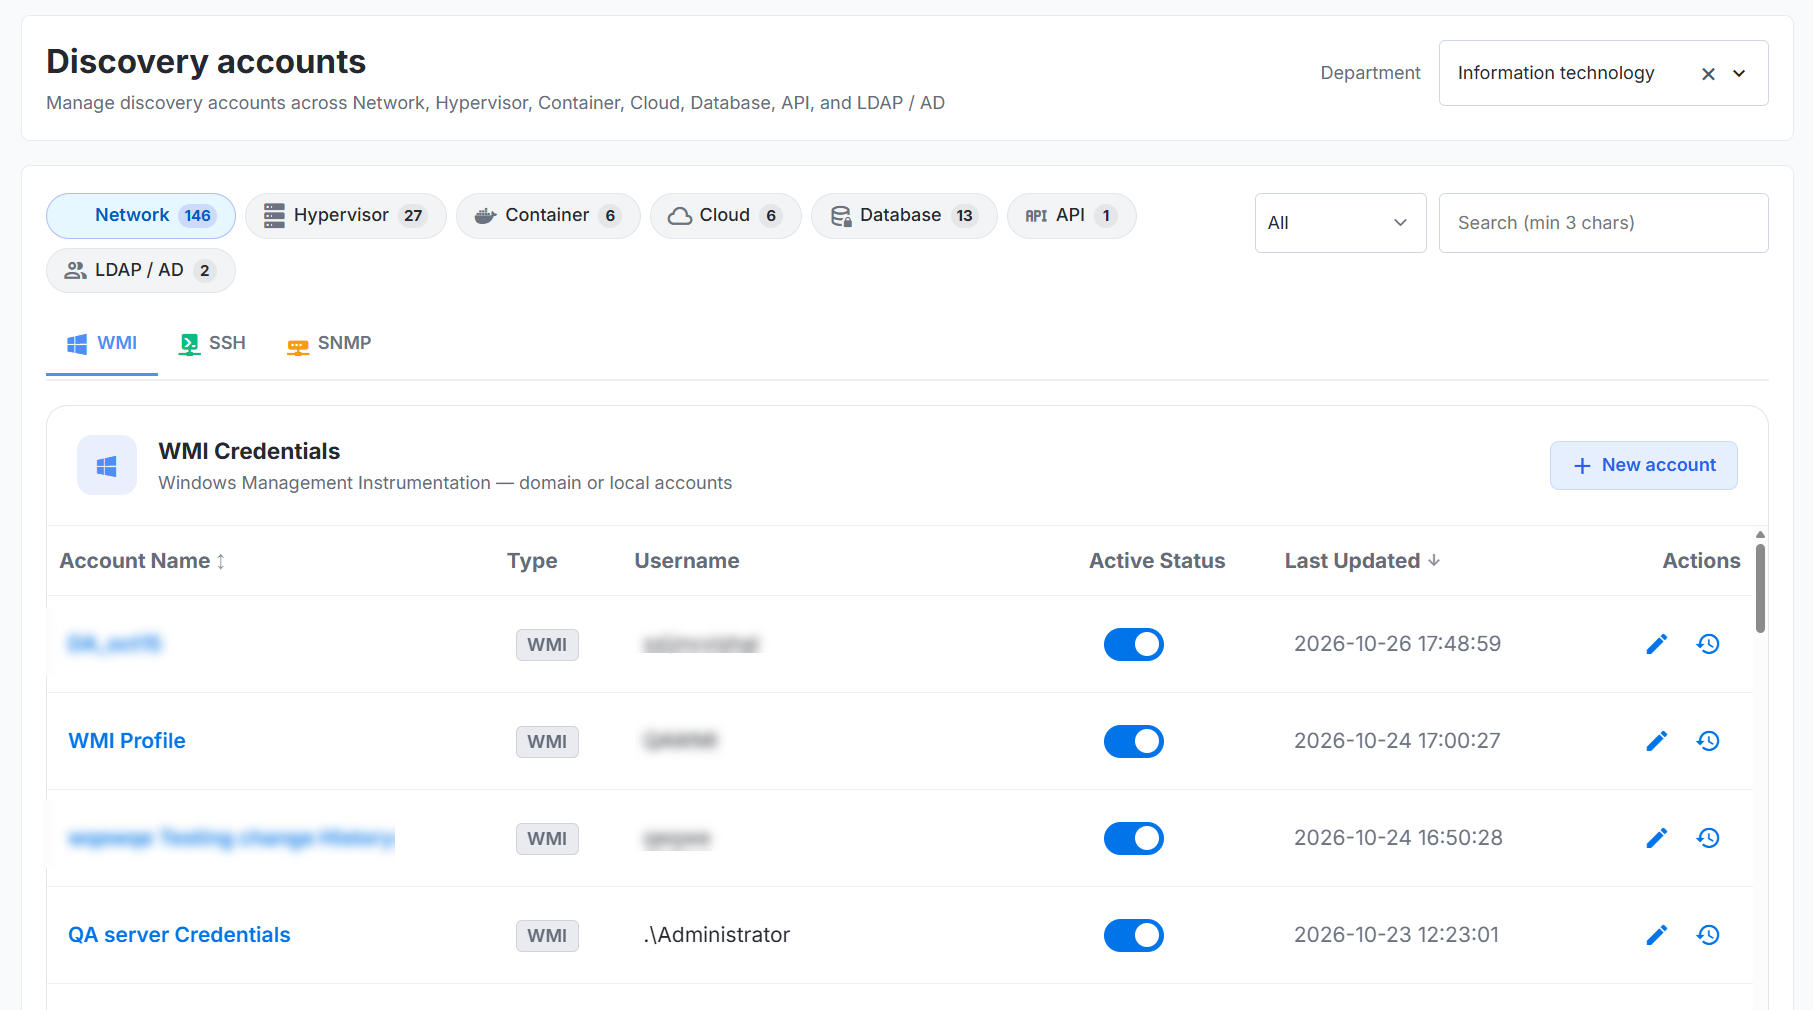
Figure: Network Accounts
Access Network Discovery Accounts
Access the Network tab on the Discovery Accounts page to manage WMI, SSH, and SNMP credentials. Review existing credential profiles or create a new profile for network discovery.
To access the Network discovery accounts, perform the following:
Navigate to Discovery Accounts. By default, the system displays Network tab.
Select one of the following credential types:
WMI
SSH
SNMP
As an admin you can review the existing credential profiles or create a new profile.
WMI Credentials
WMI credentials allow the Discovery Worker to authenticate with Windows devices through Windows Management Instrumentation. You can use a Windows domain account or a local account that has the permissions needed to access the target device.
To create a WMI credential profile, perform the following steps:
Select the WMI tab.
Click New account in the upper-right corner.
Enter the required credential details. For more information, see Field Description
In Test target host / IP, enter the hostname or IP address of a Windows device on which you want to test the credentials.
Select a Discovery Worker from the dropdown. The system lists the workers from the configured Discovery Workers. For more information, refer Discovery Worker.
Click Test Connection to test the credentials.
Click Save Profile.
To close the form without saving the profile, click Cancel.
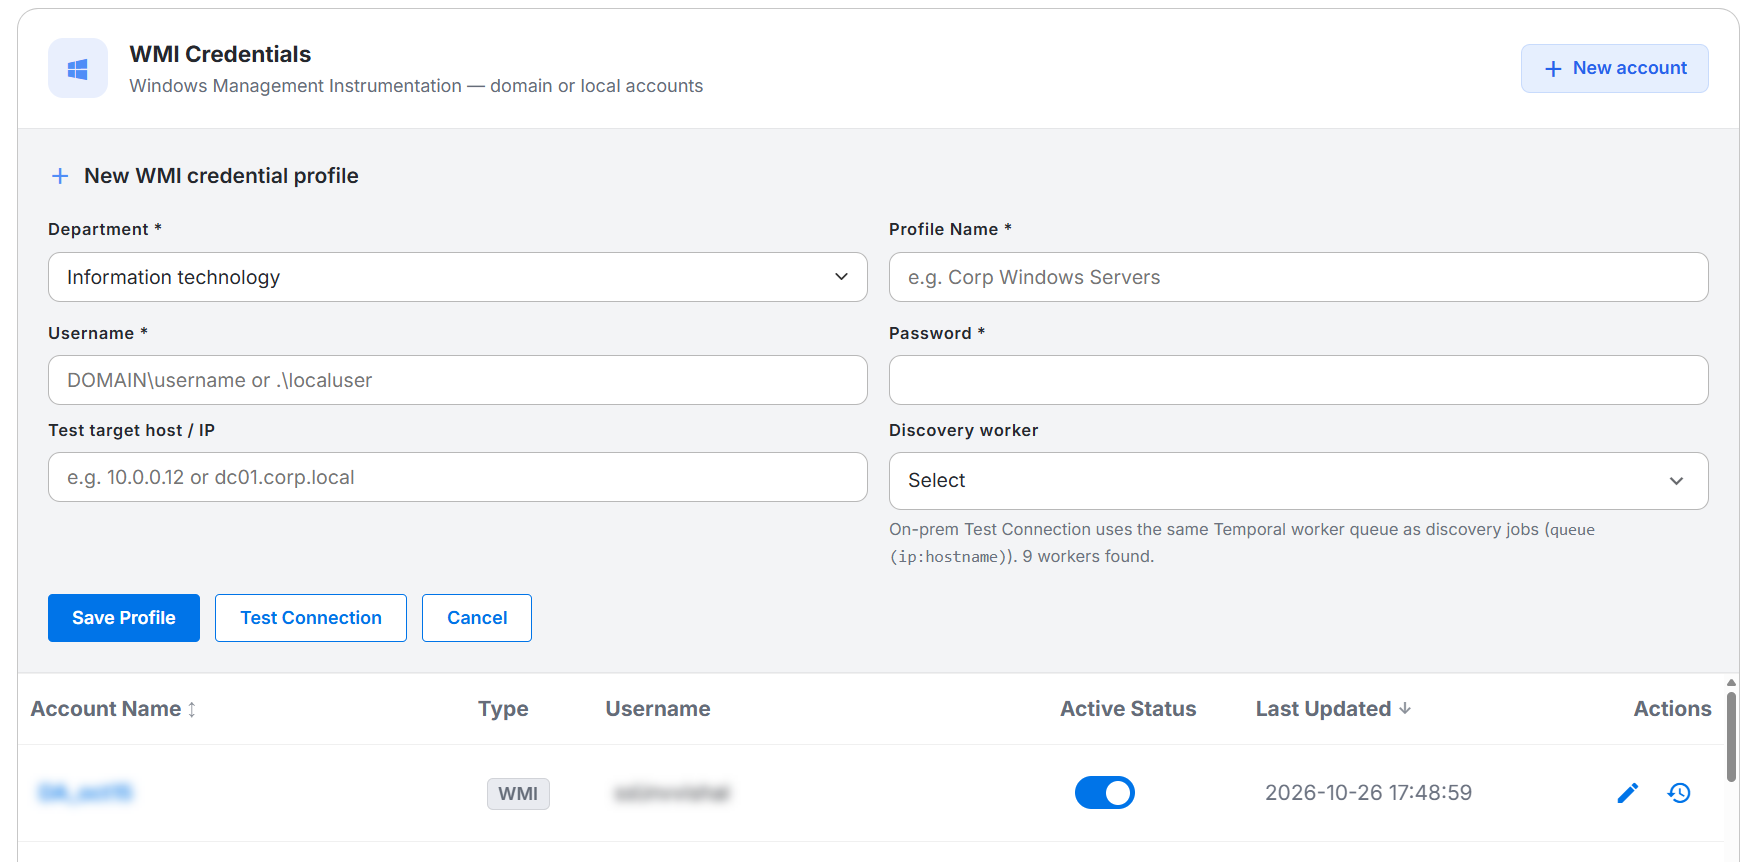
Figure: WMI Discovery Account Creation
WMI Credential Fields
Field | Description |
|---|---|
Department | Select the Department for which you want to create the credential profile. |
Profile Name | Enter a unique and descriptive name for the WMI credential profile. For example, Corporate Windows Servers. |
Username | Enter the Windows domain account or local account username. Use DOMAIN\username for a domain account or .\localuser for a local account. |
Password | Enter the password associated with the specified Windows account. |
Test target host / IP | Enter the hostname or IP address of a Windows device on which you want to test the credentials. For example, 10.0.0.12 or dc01.corp.local. |
Discovery worker | Select the Discovery Worker that can connect to the test target. The selected worker checks access to the specified device. |
WMI Form Actions
Action | Description |
|---|---|
Save Profile | Saves the WMI credential profile. |
Test Connection | Tests the credentials against the specified target device through the selected Discovery Worker. |
Cancel | Closes the credential form without saving the entered details. |
WMI Test Connection Report
The WMI connection test validates the credential material, target resolution, Windows communication ports, and authentication endpoint.
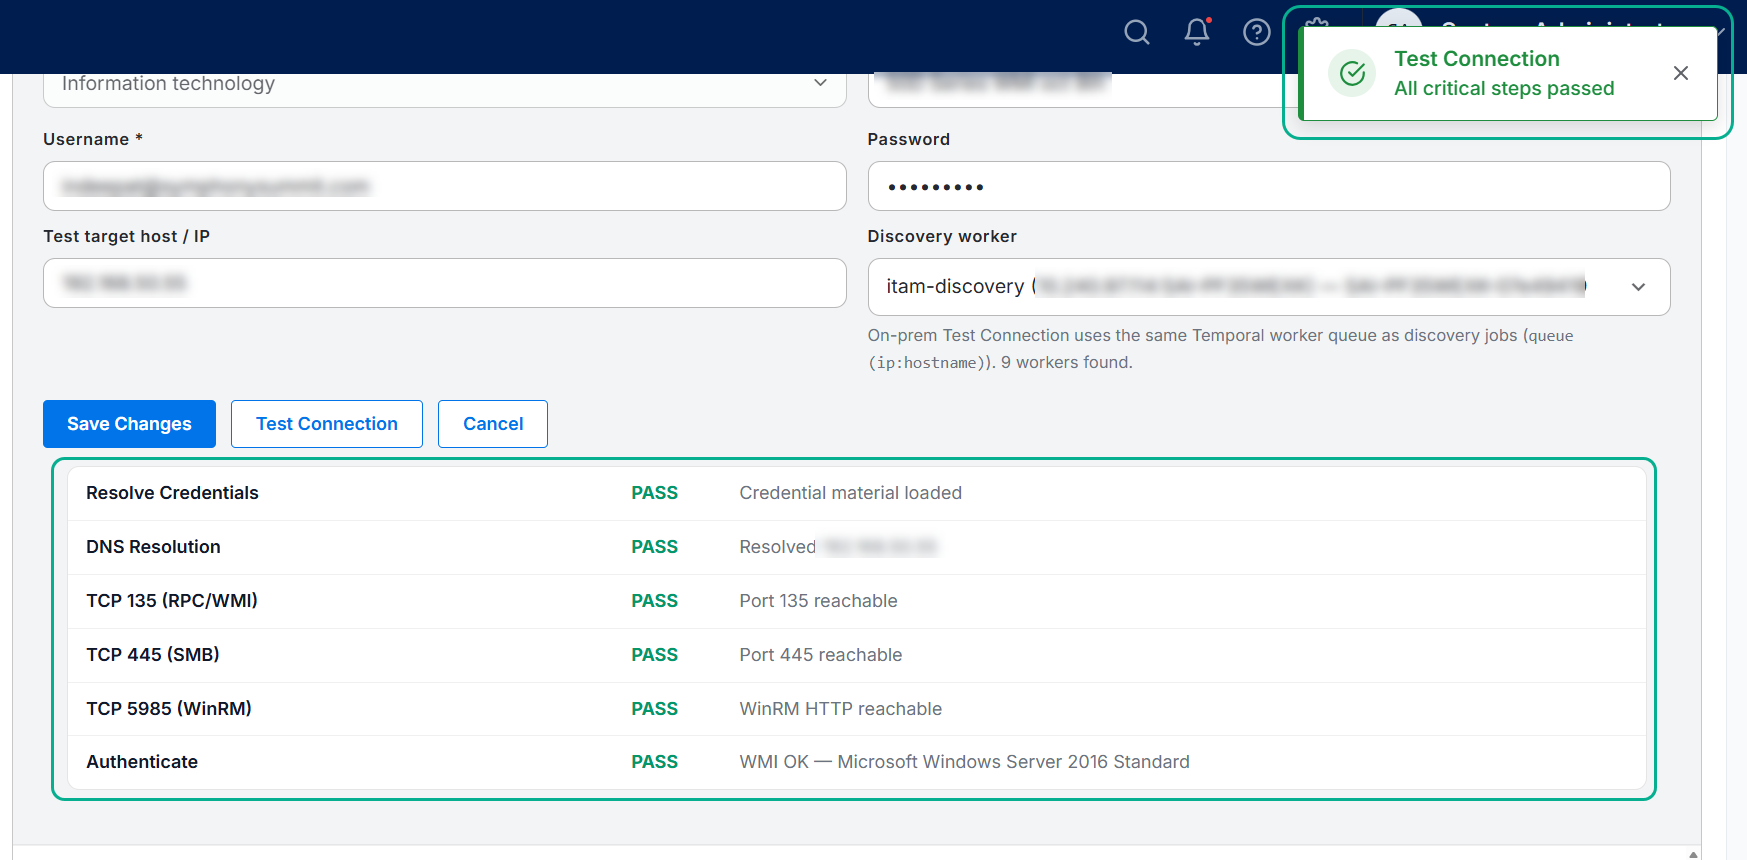
Figure: WMI Test Connection
Validation Step | Description |
|---|---|
Resolve Credentials | Verifies that the application can load the WMI username and password entered in the credential profile. A successful result displays Credential material loaded. |
DNS Resolution | Resolves the hostname in Test target host / IP to an IP address. When you enter an IP address directly, the test confirms the resolved target. |
TCP 135 (RPC/WMI) | Checks whether the Discovery Worker can reach TCP port 135 on the target device for RPC and WMI communication. If this check fails, verify the firewall rules, WMI configuration, and network connectivity. |
TCP 445 (SMB) | Checks whether the Discovery Worker can reach TCP port 445 on the target device for SMB communication. A warning indicates that some WMI discovery paths might fail. |
TCP 5985 (WinRM) | Checks whether the Discovery Worker can reach TCP port 5985 for WinRM over HTTP. The report can mark this check as SKIP when WinRM is optional or unavailable. |
Authenticate | Verifies whether the Discovery Worker can authenticate with an available WMI or WinRM endpoint by using the entered credentials. |
Note
Authentication can fail when the required WMI or WinRM endpoint is unreachable, even if the credential and DNS resolution checks pass.
SSH Authentication Types
Configure password-based SSH credentials that the selected Discovery Worker can use to connect to Linux or Unix devices and run discovery commands. You can enable sudo for commands that require elevated privileges and verify the credentials against a target device before saving the profile.
SSH credential profiles support the following authentication types:
Authentication Type | Description |
|---|---|
Password | Authenticates with the target Linux or Unix device by using a username and password. |
Private Key | Authenticates with the target Linux or Unix device by using a username, a private key in PEM format, and an optional passphrase. |
The fields in the credential form change according to the selected authentication type.
Create an SSH Credential Profile Using Password Authentication
Use Password authentication when the SSH account on the target devices allows sign-in with a username and password.
To create an SSH credential profile using a password, perform the following steps:
Navigate to ITAM > Asset > Discovery > Discovery Accounts.
Select Network and then select SSH tab.
Click New account in the upper-right corner.
Select Department from the dropdown.
Enter a profile name.
From the Auth Type list, select Password.
Enter the username and password.
Enter the SSH port.
Enable sudo if the account must run discovery commands with elevated privileges.
In Test target host / IP, enter the hostname or IP address of a Linux or Unix device.
Select a Discovery Worker that can connect to the target device.
Click Test Connection to check the credentials.
Click Save Profile.
To close the form without saving the profile, click Cancel.
Password Authentication Fields
Field | Description |
|---|---|
Department | Select the Department for which you want to create the SSH credential profile. |
Profile Name | Enter a unique and descriptive name for the credential profile. For example, Production Linux Servers. |
Auth Type | Select Password to authenticate with a username and password. |
Username | Enter the username that the Discovery Worker must use to connect to the target device. |
Password | Enter the password associated with the specified username. |
Port | Enter the port configured for SSH communication on the target device. |
sudo | Enable this option when the specified account must run discovery commands with elevated privileges. Ensure that the account has the required sudo permissions. |
Test target host / IP | Enter the hostname or IP address of the Linux or Unix device on which you want to test the credentials. For example, 10.0.0.12 or linux01.corp.local. |
Discovery worker | Select the Discovery Worker that can connect to the test target. The connection test uses the selected worker to check the credentials. |
Create an SSH Credential Profile Using Private Key Authentication
To create an SSH credential profile using a private key, perform the following steps:
Select the SSH tab.
Click New account in the upper-right corner.
Select the Department.
Enter a profile name.
From the Auth Type list, select Private Key.
Enter the username.
In Private Key (PEM), paste the complete private key in PEM format.
If the private key has a passphrase, enter the passphrase.
Enter the SSH port.
Enable sudo if the account must run discovery commands with elevated privileges.
In Test target host / IP, enter the hostname or IP address of a Linux or Unix device.
Select a Discovery Worker that can connect to the target device.
Click Test Connection to check the private key and connection details.
Click Save Profile.
To close the form without saving the profile, click Cancel.
Private Key Authentication Fields
Field | Description |
|---|---|
Department | Select the Department for which you want to create the SSH credential profile. |
Profile Name | Enter a unique and descriptive name for the credential profile. For example, Production Linux Key Authentication. |
Auth Type | Select Private Key to authenticate with a username and private key. |
Username | Enter the username associated with the public key configured on the target device. |
Private Key (PEM) | Paste the complete private key in PEM format. Include the private key header, key content, and footer. For example, the key can begin with -----BEGIN OPENSSH PRIVATE KEY-----. |
Passphrase (opt.) | Enter the passphrase used to protect the private key. Leave this field blank if the private key does not have a passphrase. |
Port | Enter the port configured for SSH communication on the target device. |
sudo | Enable this option when the specified account must run discovery commands with elevated privileges. Ensure that the account has the required sudo permissions. |
Test target host / IP | Enter the hostname or IP address of the Linux or Unix device on which you want to test the credentials. For example, 10.0.0.12 or linux01.corp.local. |
Discovery worker | Select the Discovery Worker that can connect to the test target. The connection test uses the selected worker to check the private key and connection details. |
Note
On-prem Test Connection uses the same Temporal worker queue as discovery jobs (queue (ip:hostname)). 4 workers found. Workers registered but offline. Start or reinstall a discovery worker pointed at this environment.
Security: Do not enter or upload a public key in the Private Key (PEM) field. Store and share private keys according to your organization’s credential-management policy.
SSH Credential Actions
Action | Description |
|---|---|
Save Profile | Saves the SSH credential profile. |
Test Connection | Tests the selected authentication method against the specified target device through the selected Discovery Worker. |
Cancel | Closes the credential form without saving the entered details. |
SSH Test Connection Report
The SSH connection test validates the credential material, target resolution, and connectivity to the configured SSH port.
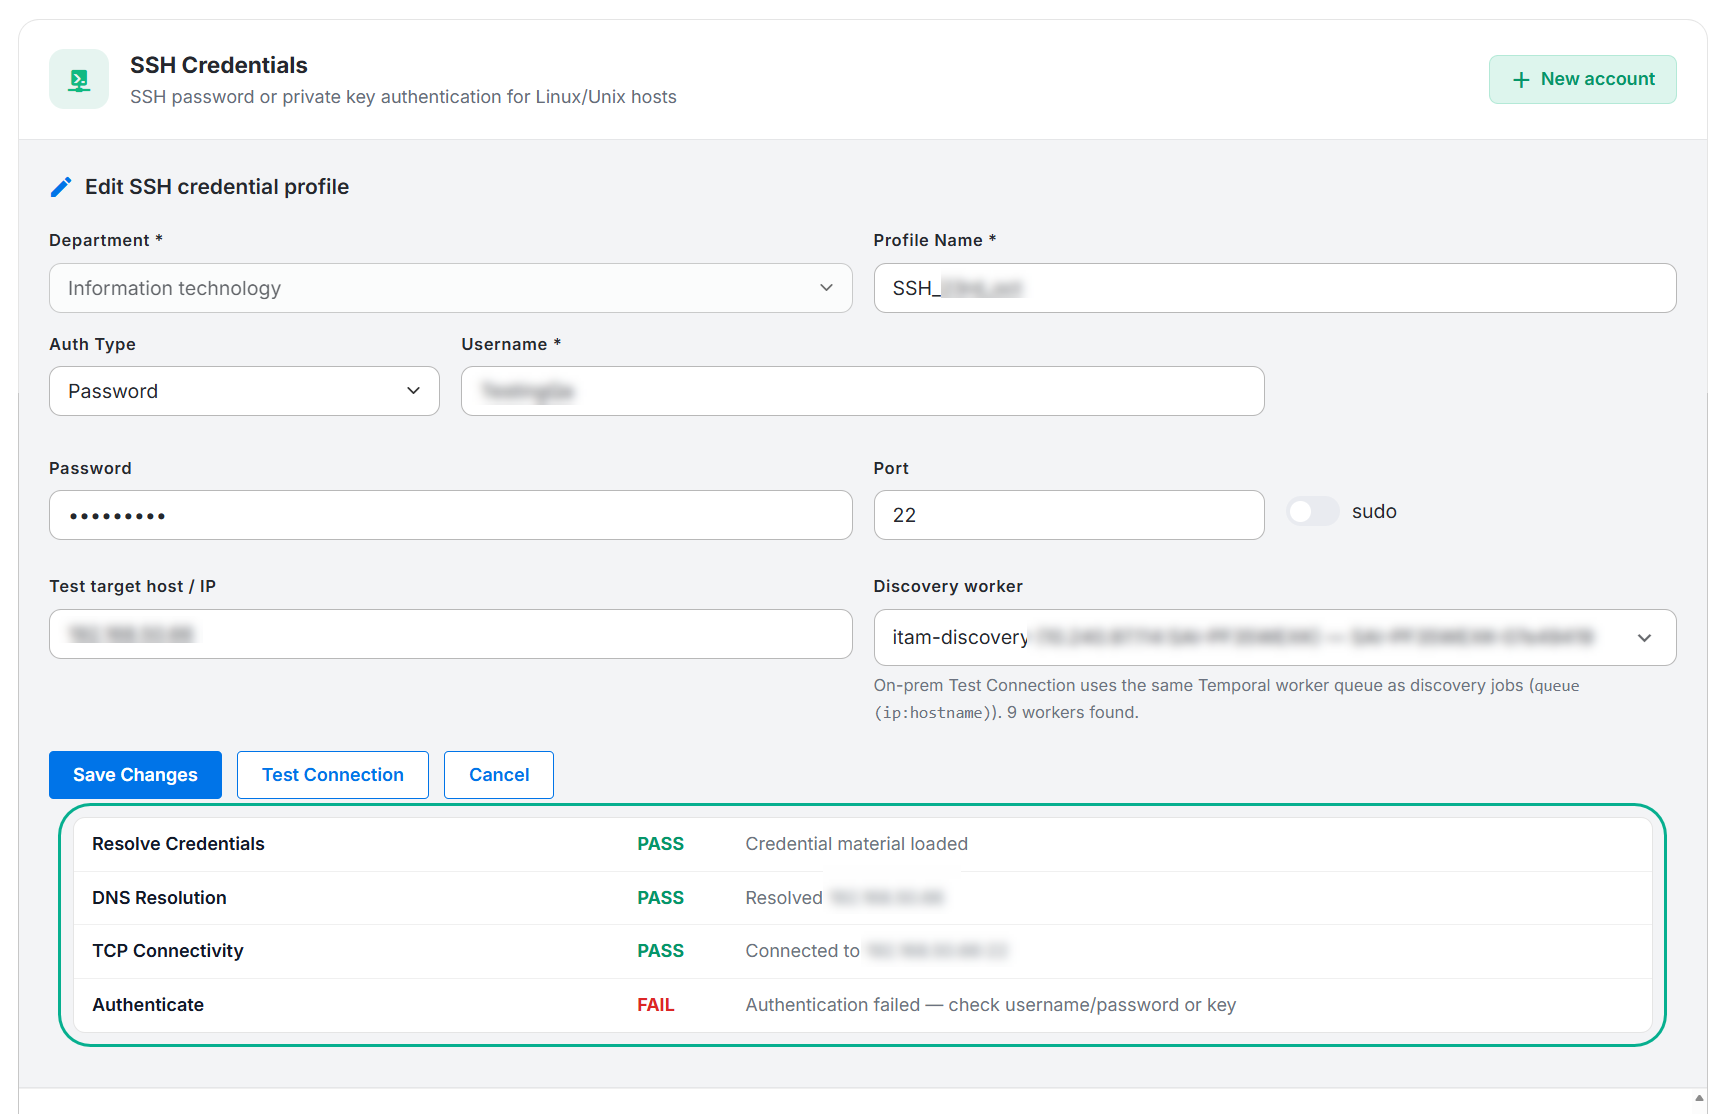
Figure: Test Connection
Validation Step | Description |
|---|---|
Resolve Credentials | Verifies that the application can load the SSH username and the configured password or private key. A successful result displays Credential material loaded. |
DNS Resolution | Resolves the hostname in Test target host / IP to an IP address. When you enter an IP address directly, the test confirms the resolved target. |
TCP Connectivity | Checks whether the Discovery Worker can reach the target device through the port entered in the SSH credential profile. |
Note
If TCP Connectivity fails, the application cannot continue with SSH authentication. Confirm that the SSH service runs on the target device and listens on the port specified in the credential profile.
SNMP Credentials
SNMP credential profiles allow the Discovery Worker to connect to supported SNMP-enabled devices, such as routers, switches, printers, and other network devices.
The SNMP credential form supports the following versions:
SNMP Version | Description |
|---|---|
Uses a community string to authenticate with devices that support SNMPv1. Used only for older or legacy devices that do not support SNMPv2c or SNMPv3.It uses a community string but does not provide encryption and has limited monitoring capabilities, so avoid it for new device configurations. | |
Uses a community string to authenticate with devices that support SNMPv2c. Use for devices that support SNMPv2c when the system requires efficient monitoring and the devices are on a trusted, restricted network. | |
Uses a security name and configurable authentication and privacy settings to authenticate with devices that support SNMPv3. Use when the devices support SNMPv3 and the network requires authenticated or encrypted communication. This is the preferred option for modern enterprise environments, particularly when credentials and discovered device information require protection in transit. |
The fields in the credential form change according to the selected SNMP version. Selecting SNMPv1 or SNMPv2c displays the Community String field. Selecting SNMPv3 displays the security, authentication, and privacy fields.
To access SNMP credentials, perform the following steps:
Navigate to Discovery Accounts.
Select the Network tab.
Select SNMP.
Review the existing SNMP credential profiles or create a new profile.
Create an SNMPv1 or SNMPv2c Credential Profile
SNMPv1 and SNMPv2c profiles use a community string to authenticate with the target device.
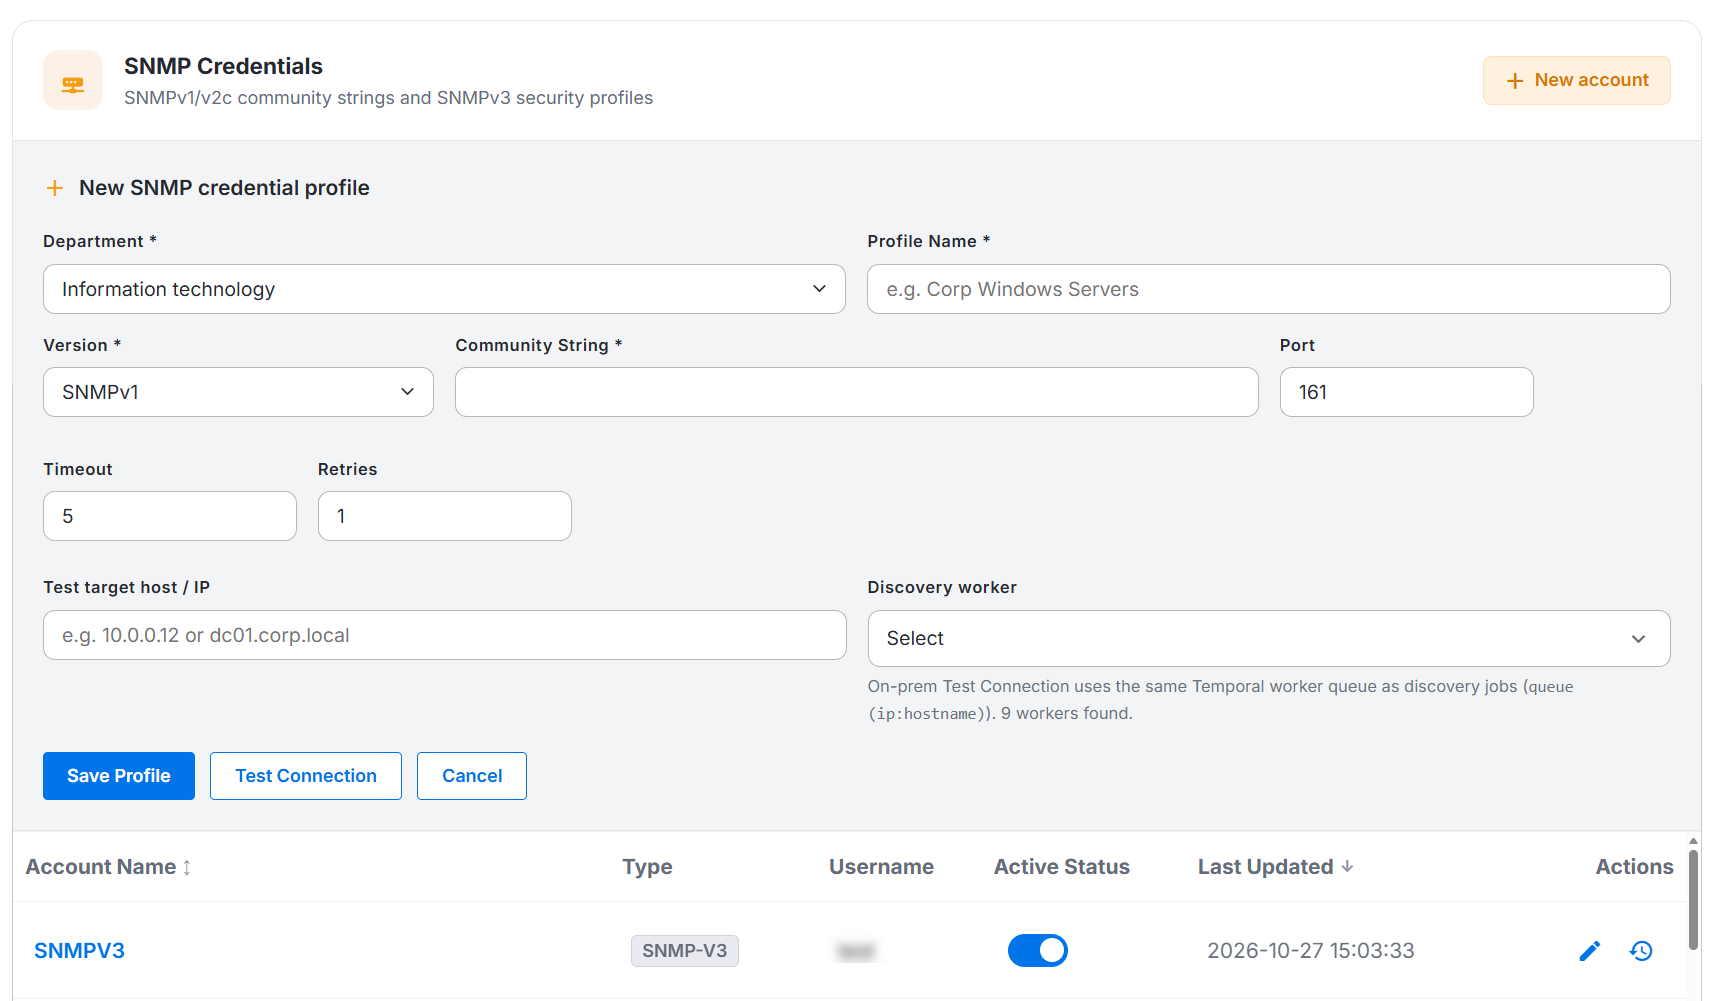
Figure: SNMP Credential
To create an SNMPv1 or SNMPv2c credential profile, perform the following steps:
Select the SNMP tab.
Click New account in the upper-right corner.
Select the Department.
Enter a profile name.
From the Version list, select SNMPv1 or SNMPv2c.
Enter the community string configured on the target device.
Enter the port, timeout, and retry values.
In Test target host / IP, enter the hostname or IP address of an SNMP-enabled device.
Select a Discovery Worker that can connect to the target device.
Click Test Connection to test the SNMP configuration.
Click Save Profile.
To close the form without saving the profile, click Cancel.
SNMPv1 and SNMPv2c Fields
Field | Description |
|---|---|
Department | Select the Department for which you want to create the SNMP credential profile. |
Profile Name | Enter a unique and descriptive name for the credential profile. For example, Branch Network Devices. |
Version | Select SNMPv1 or SNMPv2c, according to the SNMP version configured on the target devices. |
Community String | Enter the community string configured on the target devices. The Discovery Worker uses this value to authenticate SNMP requests. |
Port | Enter the port configured for SNMP communication on the target devices. |
Timeout | Enter the duration for which the Discovery Worker must wait for a response before the SNMP request times out. |
Retries | Enter the number of times the Discovery Worker must retry the request when the target device does not respond. |
Test target host / IP | Enter the hostname or IP address of an SNMP-enabled device on which you want to test the credential profile. For example, 10.0.0.12 or network-device.corp.local. |
Discovery worker | Select the Discovery Worker that can connect to the test target. The connection test uses the selected worker to check the community string and network connectivity. |
Create an SNMPv3 Credential Profile
SNMPv3 supports configurable security levels. The fields displayed in the form depend on the selected security level.
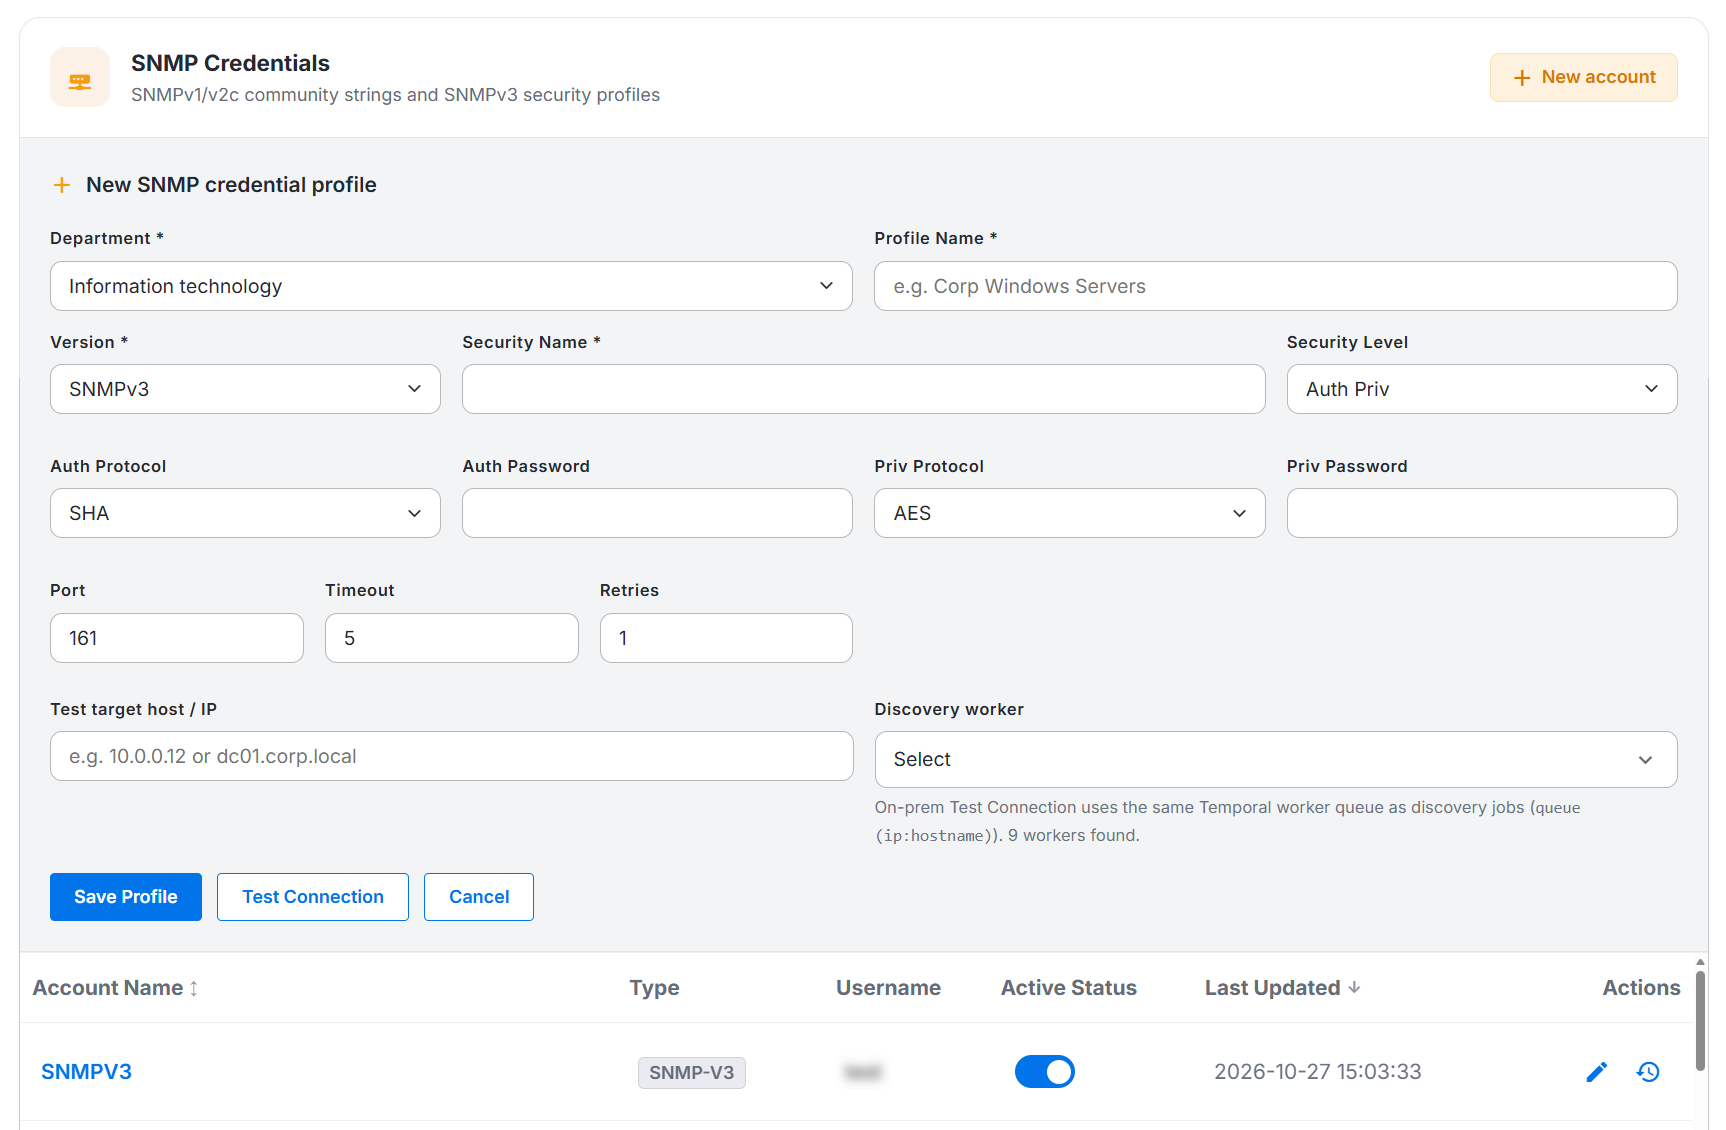
Figure: SNMPv3 Credential
To create an SNMPv3 credential profile, perform the following steps:
Select the SNMP tab.
Click New account in the upper-right corner.
Select the Department.
Enter a profile name.
From the Version list, select SNMPv3.
Enter the security name configured on the target device.
Select the required security level.
If the selected security level requires authentication, select the authentication protocol and enter the authentication password.
If the selected security level requires privacy, select the privacy protocol and enter the privacy password.
Enter the port, timeout, and retry values.
In Test target host / IP, enter the hostname or IP address of an SNMPv3-enabled device.
Select a Discovery Worker that can connect to the target device.
Click Test Connection to check the SNMPv3 configuration.
Click Save Profile.
To close the form without saving the profile, click Cancel.
SNMPv3 Fields
Field | Description |
|---|---|
Department | Select the Department for which you want to create the SNMPv3 credential profile. |
Profile Name | Enter a unique and descriptive name for the credential profile. For example, SNMPv3 Network Devices. |
Version | Select SNMPv3 to display the SNMPv3 security, authentication, and privacy fields. |
Security Name | Enter the SNMPv3 security name configured on the target device. The security name identifies the SNMPv3 user whose security settings the Discovery Worker uses. |
Security Level | Select the security level configured for the SNMPv3 user on the target device. The selected level determines whether the profile requires authentication and privacy settings. For more information, refer SNMPv3 Security Levels |
Auth Protocol | Select the authentication protocol configured for the SNMPv3 user. For example, select SHA when the target device uses SHA-based authentication. This field applies when the selected security level requires authentication. |
Auth Password | Enter the authentication password configured for the SNMPv3 user. This field applies when the selected security level requires authentication. |
Priv Protocol | Select the privacy protocol configured for the SNMPv3 user. For example, select AES when the target device uses AES encryption. This field applies when the selected security level requires privacy. |
Priv Password | Enter the privacy password configured for the SNMPv3 user. This field applies when the selected security level requires privacy. |
Port | Enter the port configured for SNMP communication on the target device. |
Timeout | Enter the duration for which the Discovery Worker must wait for a response before the SNMP request times out. |
Retries | Enter the number of times the Discovery Worker must retry the request when the target device does not respond. |
Test target host / IP | Enter the hostname or IP address of an SNMPv3-enabled device on which you want to test the profile. For example, 10.0.0.12 or network-device.corp.local. |
Discovery worker | Select the Discovery Worker that can connect to the test target. The connection test uses the selected worker to check the SNMPv3 configuration and network connectivity. |
SNMPv3 Security Levels
The selected Security Level controls which authentication and privacy fields apply to the profile.
Security Level | Authentication | Privacy | Required Configuration |
|---|---|---|---|
No | No | Enter the security name. Authentication and privacy settings do not apply. | |
Yes | No | Enter the security name, select an authentication protocol, and enter the authentication password. | |
Yes | Yes | Enter the security name, select authentication and privacy protocols, and enter the authentication and privacy passwords. |
No Auth No Priv
Select No Auth No Priv when the SNMPv3 user does not require authentication or encrypted communication.
Field | Description |
|---|---|
Security Name | Enter the security name configured for the SNMPv3 user on the target device. |
Port | Enter the port configured for SNMP communication on the target device. |
Timeout | Enter the duration for which the Discovery Worker waits for a response before the SNMP request times out. |
Retries | Enter the number of times the Discovery Worker retries the request when the target device does not respond. |
Test target host / IP | Enter the hostname or IP address of an SNMPv3-enabled device on which you want to test the credential profile. For example, 10.0.0.12 or network-device.corp.local. |
Discovery worker | Select the Discovery Worker that can connect to the target device and test the SNMPv3 configuration. |
Note
The Auth Protocol, Auth Password, Priv Protocol, and Priv Password fields do not apply to this security level.
Auth No Priv
Select Auth No Priv when the SNMPv3 user requires authentication but does not require encrypted communication.
Field | Description |
|---|---|
Security Name | Enter the security name configured for the SNMPv3 user on the target device. |
Auth Protocol | Select the authentication protocol configured for the SNMPv3 user. The available options are MDA, SHA, SHA256, and SHA-512. |
Auth Password | Enter the authentication password configured for the SNMPv3 user. |
Port | Enter the port configured for SNMP communication on the target device. |
Timeout | Enter the duration for which the Discovery Worker waits for a response before the SNMP request times out. |
Retries | Enter the number of times the Discovery Worker retries the request when the target device does not respond. |
Test target host / IP | Enter the hostname or IP address of an SNMPv3-enabled device on which you want to test the credential profile. For example, 10.0.0.12 or network-device.corp.local. |
Discovery worker | Select the Discovery Worker that can connect to the target device and test the SNMPv3 configuration. |
Note
The Priv Protocol and Priv Password fields do not apply to this security level.
Auth Priv
Select Auth Priv when the SNMPv3 user requires authentication and encrypted communication.
Field | Description |
|---|---|
Security Name | Enter the security name configured for the SNMPv3 user on the target device. |
Auth Protocol | Select the authentication protocol configured for the SNMPv3 user. The available options are MDA, SHA, SHA256, and SHA-512. |
Auth Password | Enter the authentication password configured for the SNMPv3 user. |
Priv Protocol | Select the privacy protocol configured for the SNMPv3 user. The available options are DES, AES, AES-192, and AES-256. |
Priv Password | Enter the privacy password configured for the SNMPv3 user. The Discovery Worker uses this password with the selected privacy protocol to support encrypted communication. |
Port | Enter the port configured for SNMP communication on the target device. |
Timeout | Enter the duration for which the Discovery Worker waits for a response before the SNMP request times out. |
Retries | Enter the number of times the Discovery Worker retries the request when the target device does not respond. |
Test target host / IP | Enter the hostname or IP address of an SNMPv3-enabled device on which you want to test the credential profile. For example, 10.0.0.12 or network-device.corp.local. |
Discovery worker | Select the Discovery Worker that can connect to the target device and test the authentication, privacy, and connectivity settings. |
Note
Ensure that the security name, authentication protocol, authentication password, privacy protocol, and privacy password match the SNMPv3 user configuration on the target device.
SNMP Form Actions
Action | Description |
|---|---|
Save Profile | Saves the SNMP credential profile. |
Test Connection | Tests the SNMP configuration that you enter against the specified target device through the selected Discovery Worker. |
Cancel | Closes the credential form without saving the details you entered. |
SNMP Test Connection Report
The SNMP connection test validates the credential material, target resolution, UDP connectivity, and SNMP authentication.
Validation Step | Description |
|---|---|
Resolve Credentials | Verifies that the application can load the SNMP community string or SNMPv3 security details that you entered in the credential profile. A successful result displays Credential material loaded. |
DNS Resolution | Resolves the hostname that you enter in Test target host / IP to an IP address. When you enter an IP address directly, the test confirms the resolved target. |
UDP Connectivity | Checks the SNMP endpoint by using the configured target address and port. A successful result displays the endpoint used for the test. |
Authenticate | Sends an SNMP GET request to verify that the target device accepts the configured SNMP credentials and security settings. |
Test Result Statuses
Status | Description |
|---|---|
PASS | Indicates that the validation step completed successfully. |
FAIL | Indicates that the validation step did not complete successfully. Review the accompanying message and correct the credentials, connectivity, port, firewall, or target-device configuration. |
WARN | Indicates that the check identified a condition that might affect discovery, although the test can continue. |
SKIP | Indicates that the application did not perform the check or that the check applies to an optional connection method. |
Manage Discovery Accounts
The list page displays the credential profiles created for the selected discovery method. The same list-page fields and actions apply to WMI, SSH, and SNMP credential profiles.
List Page Fields
Field | Description |
|---|---|
Account Name | Displays the name of the credential profile. Click the account name to view the profile details. Use the sort icon in the column heading to arrange the profiles by account name. |
Type | Displays the discovery method or protocol associated with the credential profile, such as WMI, SSH, SNMP-V1, SNMP-V2C, or SNMP-V3. |
Username | Displays the username associated with a WMI or SSH profile. For an SNMPv3 profile, this field displays the security name. For SNMPv1 and SNMPv2c profiles that do not use a username, this field displays a dash (-). |
Active Status | Indicates whether the credential profile is active. Enable the toggle to make the profile available for discovery. Disable the toggle to prevent discovery from using the profile. |
Last Updated | Displays the date and time when a user most recently updated the credential profile. Use the sort icon in the column heading to arrange the profiles by the last-updated date and time. |
Actions | Provides options to edit the credential profile or view its change history. |
Edit a Credential Profile
To edit a credential profile:
Locate the credential profile in the list.
Under Actions, click the Edit icon.
Update the required fields.
If you changed the credentials or connection details, enter a test target and select a Discovery Worker.
Click Test Connection to check the updated configuration.
Click Save Profile to save the changes.
Note: For security, the application might require you to re-enter protected values, such as passwords, private keys, community strings, authentication passwords, or privacy passwords.
View Credential Change History
The Change history page provides a read-only record of changes made to a credential profile. Change history applies to WMI, SSH, and SNMP credential profiles.
The page displays the newest changes first. The application masks sensitive values, such as passwords, private keys, community strings, authentication passwords, and privacy passwords.
To view the change history of a credential profile:
Locate the credential profile in the list.
Under Actions, click the History icon.
Review the changes recorded for the selected credential profile.
Click Close or the Close icon to return to the credential profile list.
Change History Fields
Field | Description |
|---|---|
Field name | Displays the name of the profile field that a user created or modified. Examples include Active, Discovery Credential Name, Department, and Used for. |
Old value | Displays the field value before the change. A dash (—) indicates that the field did not contain a previous value, such as when a user first creates the credential profile. The application masks sensitive values. |
New value | Displays the field value after the change. For example, changing the Active field from Active to Inactive indicates that a user deactivated the credential profile. The application masks sensitive values. |
Date changed | Displays the date and time when the change occurred. The page lists the newest changes first. |
Changed by | Displays the identifier of the user who created the credential profile or changed the field. |
Change History Information
Item | Description |
|---|---|
Record count | Displays the number of change records currently shown and the total number of available records. For example, Showing 7 of 7 indicates that the page displays all seven available records. |
Read-only history | Indicates that users can review the recorded changes but cannot change or delete the records from the Change history page. |
Newest changes first | Indicates that the page lists the most recent change at the top. |
Masked secrets | Indicates that the page hides protected credential values to prevent sensitive information from appearing in the history. |
Close | Closes the Change history page and returns to the credential profile list. |
Change the Active Status
To activate or deactivate a credential profile:
Locate the credential profile in the list.
Under Active Status, use the toggle to change the profile status:
Enable the toggle to activate the profile.
Disable the toggle to deactivate the profile.
An active credential profile remains available for discovery. An inactive credential profile remains on the list page, but discovery cannot use the profile.
Caution: Deactivating a credential profile can affect discovery jobs that use the profile. Review the associated discovery jobs before changing the profile status.